Crepes--Definitely 'Good Eats'


4/26/09: Reheated Chicken Taco and Sloppy Joe leftovers (see my Sloppy Joe experience here) that we previously froze. And for dessert: crepes from scratch.
Here are my personal crepe making instructions: preheat pan (I used a 10") to medium-high heat, spread a teeny-weeny bit of butter in the pan or use cooking spray, pour about 1/4 cup of batter into the pan and spread it around, wait 10 seconds, start lifting the edges a little with you spatula, wait until you see bulges forming and flip, keep flipping until both sides are a bit brown. See the photo below.


Oui, Madame, we have ze crepes on thee menu. :)
- Sources: The crepe recipe came courtesy of Alton Brown, the host of Good Eats on Food Network.
- Defining moments: Well, just saying, "I made CREPES," is amazing and jaw dropping for me. Crepes sound so exotic and impossible to make, but I quickly discovered that they're not all that bad. And I mustn't forget that this would be my first time making an Alton Brown recipe. I've been watching him since we first switched from cable to Dish Network, so that's, um, eight years. You can see that I am more of a watcher than a doer.
- What I learned: Crepes don't stick! I've heard again and again that crepes are notorious for sticking and that is why everyone uses a non-stick skillet. In the beginning I thought that I wouldn't be able to do the crepes well because a) we don't have a non-stick skillet, and b) I was going to use our large, family-of-eight-sized griddle. As soon as I was done making the crepe batter I decided to just make one tiny crepe using our everyday stainless steal pan. Guess what? No sticking whatsoever and since I didn't notice any tearing problem I made the choice to not refrigerate the batter, as the recipe says to do. According to the recipe, refrigerating the batter for an hour will remedy any crepe tearing.
Here are my personal crepe making instructions: preheat pan (I used a 10") to medium-high heat, spread a teeny-weeny bit of butter in the pan or use cooking spray, pour about 1/4 cup of batter into the pan and spread it around, wait 10 seconds, start lifting the edges a little with you spatula, wait until you see bulges forming and flip, keep flipping until both sides are a bit brown. See the photo below.
- How it tasted: "Bon," as the French would say. We had it with Smucker's triple berry ice cream topping and whipped topping. Yummy!
- How about a 2nd time? Once you have three pans going at once you can make a lot of these in a short amount of time. So, yeah, I think it is possible for me to make them again and highly probable to find people to eat them.


Oui, Madame, we have ze crepes on thee menu. :)
The Best Blog Design Award Goes To. . .
My sister! Thank you Catherine for taking the photos of our blue/white floral dish set and adding it to this blog. You do fantastic work!
Sincerely,
Your eternally grateful sister
Sincerely,
Your eternally grateful sister
All Nicely Folded and Crimped - Making Calzones II
4/19/09: Calzones with Pork Sausage for the 2nd time


And here they are all baked up and oozing with goodness:


- Sources: myrecipes.com. Original recipe is called Sausage and Pepper Calzones and you can find it HERE.
- Defining moments: First time for a second time. Does that make sense? Let me explain: this would be my first time reusing a recipe that I posted here on my blog. There, that's better. See my first attempt.
- What I learned: I learned that I always seem to pick a cold, windy day for making bread dough! I made it through alright though, the dough seemed to feel snug as a bug in the warm oven where I left it for an hour. Anything else? Well, yes. Since I couldn't find any small can of tomato sauce or pizza sauce to use in the calzone filling, I decided to add some homemade salsa and picante sauce. So I learned that they make great substitutes!
- How it tasted: I think they were better than my first. . . Well, they look tidier anyway! I had positive feedback from everyone. Calzones must be 'satisfactory' (as my Papa would say) to everyone--they didn't pin me up against a wall when I suggested it!
- How about another time? Three's a charm, they say. :)
Here I am crimping and forming the calzones:


And here they are all baked up and oozing with goodness:


What happened to Easter Sunday?
4/12/09:
Q: So why no post for Easter Sunday?
A: Had a day off because the Easter dinner meal consisted of precooked ham, marshmallow salad, and yams--all made by my parents. So didn't end up tying on my apron that day.
Q: So why no post for Easter Sunday?
A: Had a day off because the Easter dinner meal consisted of precooked ham, marshmallow salad, and yams--all made by my parents. So didn't end up tying on my apron that day.
Oven Fried Chicken with Curly Fries
4/05/09: Oven Fried Chicken with Curly Fries


- Sources: For the chicken--allrecipes.com, for the curly fries--original recipe (see below).
- Defining moments: First time using cornflake coating for chicken and first time making homemade curly fries.
- What I learned: I learned how to use the curly fry machine (aka Tater Twister).
- Modifications: I changed the spices for the chicken from sage seasoning to poultry seasoning, and I also went lighter on the rosemary. For the curly fries, I just added olive oil, salt, and pepper.
- How it tasted: Good reviews from everyone.


Mr. Twinkie, Meet Mr. Peach
3/29/09: Sponge Cake with Peaches and Whipped Topping
One last thing: I learned that whipped topping came in a box! Never knew that one. I used a boxed version called Dream Whip.


- Sources: Annemarie's Betty Crocker cookbook. The title of the sponge cake recipe is "Inexpensive Sponge Cake." The idea of adding peaches and whipped topping came from the book also.
- Defining moments: First time baking sponge cake. And what I hear from Papa, this would be the first time he had homemade sponge cake. Last but not least, I am using our frozen peaches from last year! Yay!
- What I learned: I learned that frozen peaches may not be as firm as the canned ones but they sure are good, nonetheless! I also learned that decorating a cake is, well to put it mildly, FUN. :) Especially when it comes to layered cakes.
One last thing: I learned that whipped topping came in a box! Never knew that one. I used a boxed version called Dream Whip.
- How it tasted: Better than a Twinkie, I think! I had a lot of good feedback and I now declare the Sponge Cake as my favorite type of cake.
- How about a 2nd time? I have 2 1/2 quarts of peaches left, so absolutely.


"In the golden lightning
Of the sunken sun,
O'er which clouds are brightening.
Thou dost float and run,
Like an unbodied joy whose race is just begun."
An excerpt from the poem "To a Skylark," written by Percy Shelley. I was reading this poem for school around the time I made the cake and I believe it goes very well with the golden peaches and the clouds of whipped topping, don't you think? And the cake certainly did give joy to those who had a piece! :)
Of the sunken sun,
O'er which clouds are brightening.
Thou dost float and run,
Like an unbodied joy whose race is just begun."
An excerpt from the poem "To a Skylark," written by Percy Shelley. I was reading this poem for school around the time I made the cake and I believe it goes very well with the golden peaches and the clouds of whipped topping, don't you think? And the cake certainly did give joy to those who had a piece! :)
Muffuletta--say what?
3/22/09: Muffuletta, the sandwich of New Orleans, Louisana.
The olive salad I made showed me the striking difference between olives (I used green and black) and I also tried out red wine vinegar. I don't remember using or tasting this type of vinegar before, so this recipe allowed me to be introduced to a new ingredient.
Since I didn't follow any one recipe for the salad and choices of meat and cheese, I will write here what I used for the muffuletta filling:
Rebekah's Olive Salad (enough for two 10" muffuletta sandwiches)
10 oz. black olives
3 oz. green olives stuffed with pimentos
1 small onion
1/3 cup olive oil
1/4 cup red wine vinegar
pepper
oregano
And for the choice of meat and cheese. . .
I used thinly sliced ham and mozzarella cheese. I was planning on adding summer sausage to the filling but can you believe it? I forgot. That's me for you!


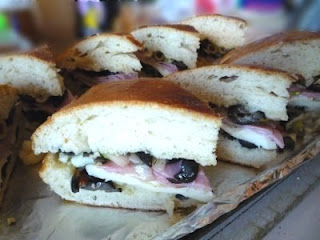
Gosh, what would I do without that non-stick aluminum foil from Reynold's? (Look at above photos.)
- Sources: I gathered various muffuletta recipes from the internet and sort of made my own choice of ingredients for the filling. One recipe that was used for inspiration is Emeril Lagasse's Muffuletta. The bread recipe came from www.nolacuisine.com. The source of the idea to make muffuletta is the Food Network show, Throwdown with Bobby Flay. Bobby Flay was competing against some New Orleans brothers for the title of best muffuletta and while the two teams competed against each other I thought to myself, "Gee, that sandwich looks good!" And so it took off from there.
- Defining moments: First time for muffuletta.
- What I learned: First and foremost I learned what a muffuletta is. That's always important. So here comes a history lesson: the word muffuletta comes from the Italian word muffa, which means mold, and the bread was first made by Sicilian women. The bread worked its way over to the U.S. and ended up being chosen as "the" bread for the muffuletta sandwich by the Central Grocery in New Orleans in 1910. The sandwich was a favorite lunch for Louisiana farmers on their trips into town. So there's the history, now just don't ask me which way to pronounce it. It is either "muff-uh-LET-ta", "muff-uh-LOT-uh", or "moo-foo-LET-ta." It's your choice, there's no wrong way in my book.
The olive salad I made showed me the striking difference between olives (I used green and black) and I also tried out red wine vinegar. I don't remember using or tasting this type of vinegar before, so this recipe allowed me to be introduced to a new ingredient.
Since I didn't follow any one recipe for the salad and choices of meat and cheese, I will write here what I used for the muffuletta filling:
Rebekah's Olive Salad (enough for two 10" muffuletta sandwiches)
10 oz. black olives
3 oz. green olives stuffed with pimentos
1 small onion
1/3 cup olive oil
1/4 cup red wine vinegar
pepper
oregano
And for the choice of meat and cheese. . .
I used thinly sliced ham and mozzarella cheese. I was planning on adding summer sausage to the filling but can you believe it? I forgot. That's me for you!
- How it tasted: It was accepted by all but there were a few complaints, one of which came from me. Number one: the bread crust was a bit too crunchy. This is the way the bread is suppose to be and it is probably caused by the egg wash that is brushed on before placing it in the oven. So the next time I make this bread I'll eliminate this step. Number two: I think the onion in the olive salad was too strong. I will add less next time or maybe none at all. Number three: according to my youngest sister, too many olives. She could be right. . . Maybe I do need to add bell peppers to the salad like my Papa suggested to me earlier.
- How about a 2nd time? I think this would be exceptional if the above changes were made to the recipe. I like muffulettas and since they can be stored in the refrigerator for a couple days (they say the longer the filling is on the bread the better the sandwich) I think this sandwich would be a good choice for the busy summer months. There is also a hot muffuletta sandwich that can be made and I think it sounds really good. Just think of it. . . hot ham, summer sausage, olive salad, and warm, melted mozzarella cheese. Mmmm.


Gosh, what would I do without that non-stick aluminum foil from Reynold's? (Look at above photos.)
My Joe! It's a Homemade Sloppy Joe + Bun!
3/15/09: Sloppy Joe's with Homemade Hamburger Buns
I learned from making the Sloppy Joe's that it is VERY important to taste as you add the strong flavorings, such as the Worcestershire and A1 sauces that I used. It is a better practice to add teeny-weeny amounts of these types of flavorings, in order to not overpower the whole dish, than to just follow the recipe. Taste it every step of the way.
I changed Rachael's recipe ingredients for the Sloppy Joe's, so here is my ingredient list: 4 lb. ground beef, 1/4 cup brown sugar, 3 tbsp. A1 steak sauce, 2 medium onions, 1 bell pepper, 6 tbsp. Worcestershire sauce, and 8 cups tomato sauce.


- Sources: The Sloppy Joe recipe is from Rachael Ray on foodtv.com and the hamburger bun recipe came from recipezaar.com.
- Defining moments: 1st time to use a recipe from the Food Network channel and 1st time to make homemade hamburger buns.
- What I learned: I never thought of making my own hamburger buns so when I found the bun recipe at the bottom of the page on recipezaar.com, I knew then and there that I will be using them this Sunday. It is a known fact that you can take a store bought bun and mush it into a small ball within seconds. (Hey, I've seen it done many a time on those Food Network hot dog eating competitions.) So I knew from the beginning that if I had Sloppy Joe's in mind I was going to have to send in the big artillery, aka a bun that can stand up to a heavy, wet sauce.
I learned from making the Sloppy Joe's that it is VERY important to taste as you add the strong flavorings, such as the Worcestershire and A1 sauces that I used. It is a better practice to add teeny-weeny amounts of these types of flavorings, in order to not overpower the whole dish, than to just follow the recipe. Taste it every step of the way.
I changed Rachael's recipe ingredients for the Sloppy Joe's, so here is my ingredient list: 4 lb. ground beef, 1/4 cup brown sugar, 3 tbsp. A1 steak sauce, 2 medium onions, 1 bell pepper, 6 tbsp. Worcestershire sauce, and 8 cups tomato sauce.
- How it tasted: Both the buns and the sauce were great, according to me and the whole family. Papa said this was the best Sloppy Joe sauce he ever had and my youngest sister said that she likes it, and she happens to not like ground beef much. The bun held up nicely and didn't become goulash in the end. :)
- How about a 2nd time? Why, uh, yeah! Definitely. And I am looking forward to making a hot dog bun shape.


One of My Favorites -- A Bread Recipe for You

St. Joseph's Day Bread
Ingredients:
2 tsp. dry yeast
1 1/2 tsp. salt
1/2 cup shortening (I used unsalted butter, melted)
2 cups (500 ml) lukewarm water (see bread making tips below)
7 cups (500 g) flour
6 eggs
2 tbsp. sesame or anise seeds
Cooking spray
Directions: Combine yeast, salt, sugar, and water. Pour flour into a bowl and make a well in the middle. Drop eggs, melted butter, and a few seeds into the well. Stir slowly, and gradually add the yeast mixture.
Knead mixture until you have a smooth, elastic dough. It may be necessary to add some extra water or flour to achieve this.
Spray the inside of a large bowl with cooking spray. Place dough inside bowl, flip dough once, and cover bowl with a warm, damp towel. (You flip dough in order for the oil to cover the top.) Leave in a warm place until doubled (about one hour).
Punch dough down, and shape into a huge round flat dough nut. As the dough will rise and expand a lot while rising a second time, make sure the hole in the middle is quite large. Place on a large greased baking sheet and sprinkle the remaining seeds on top. Cover and let rest for half an hour. Bake in a preheated oven at 375 degrees F (190 C) until done and golden brown (around 25 minutes). The bread is done when it sounds hollow when tapped on the bottom.
Serves 10 to 12.
Some bread making tips from me: Activating yeast requires the water you use to be around 120 degrees F. You should not go beyond 130 degrees (as this will kill the yeast) and below 115 (which would be too cool). Many bakers can tell the temperature of the water by feel alone, but you may want to use a cooking thermometer like we did.
It is very important that you keep your dough in a warm place when rising. I found that placing the dough on top of the stove when an open oven is at 200 degrees makes for the perfect environment.
Credits to the Photographer
I wanted to say, "Thank you" to my sister who does such a great job with my blog photos. She had to leave her painting about four times today just because of me, and she did it without one tiny sign of annoyance! Thank you very much!
Time to Catch Up with Bon Appetit--French Bread Pizza Style
3/08/09: French Bread Pizza using French Bread I Made from Scratch
In able for me to remember exactly what I did for the pizza toppings here is my ingredient list, from first layer to last: store bought pizza sauce, ground Italian sausage, Italian cheese blend, and a few slices of pepperoni on top.
After reviewing these ingredients I have come to realize how inexpensive this meal is. I glimpsed at the price tags while I was waiting for the bread to rise and I estimated that everything (including the bread) comes to the total of five dollars. $5 for eight people, now that's nice!
- Sources: French bread recipe from Annemarie's Betty Crocker cookbook and pizza recipe from recipezaar.com (Recipe #355783).
- Defining moments: First time making French bread pizza.
- What I learned: French bread takes a good amount of time to prepare--about 3 hours in all, and that is only in the rising. So what was I to preoccupy myself with during this long duration? Why reading a couple back issues of Bon Appetit of course! I may skip over a good portion of the magazine because restaurant reviews are just not my thing but I did find some interesting articles, interviews, and of course recipes. So today I learned that French bread and a magazine work exceptionally together. Hmm. . . Maybe I should do what my mom did while cooking: play a game of solitaire. Haven't played a card game in a while. :)
In able for me to remember exactly what I did for the pizza toppings here is my ingredient list, from first layer to last: store bought pizza sauce, ground Italian sausage, Italian cheese blend, and a few slices of pepperoni on top.
After reviewing these ingredients I have come to realize how inexpensive this meal is. I glimpsed at the price tags while I was waiting for the bread to rise and I estimated that everything (including the bread) comes to the total of five dollars. $5 for eight people, now that's nice!
- How it tasted: So far all good comments. But since we ate it about two hours ago I don't know the full story yet. Will add more info as soon as I receive more input from the expert food tasters.
- How about a 2nd time? Only when I have a full afternoon free. French bread takes a long time to prepare because it is a heavy dough and the yeast needs extra time to create those air pockets.
1st step:

2nd step:

3rd step:


2nd step:

3rd step:

Peach Pie Revisted
I think I should write down my peach pie recipe here because I used a couple different cook books to figure out the best way to use my canned peaches in a pie. So here it is:
Peach Pie recipe for one 10" pie (made on 2/08/09)
Pie crust ingredients for one 2-crust 10" pie:
Filling ingredients:
Directions:
Sift together dry ingredients. Cut in Crisco with pastry cutter. Pour in water (you can add more if need be). Knead dough for a few seconds. Divide dough so that one portion is slightly larger than other. Take larger portion and roll out to a circle that is about 12" in diameter. Carry dough (using rolling pin method) to pie plate that has been sprayed with cooking spray. Shape dough to plate and trim away excess. Add bread crumbs and pat to adhere.
To prepare filling: Drain peaches and coat them with cornstarch. Pour into pie plate. Preheat oven to 400°.
To make top layer of crust:
Roll out smaller piece of dough so that it is roughly 10" wide. Place on top of peaches. Tuck top layer's edges under bottom layer's and crimp with fingers. Make slits in top. Bake for 45 minutes.
Peach Pie recipe for one 10" pie (made on 2/08/09)
Pie crust ingredients for one 2-crust 10" pie:
- 2 1/2 c. flour
- 3/4 tsp. baking powder
- 1 1/2 tsp. salt
- 1 c baking Crisco
- 6-7 tbsp. water
- 3 tbsp. plain bread crumbs
- Cooking spray
Filling ingredients:
- 1 1/2 qt. canned peaches (I used the Harrow Beauty variety)
- 1/4 c. cornstarch
Directions:
Sift together dry ingredients. Cut in Crisco with pastry cutter. Pour in water (you can add more if need be). Knead dough for a few seconds. Divide dough so that one portion is slightly larger than other. Take larger portion and roll out to a circle that is about 12" in diameter. Carry dough (using rolling pin method) to pie plate that has been sprayed with cooking spray. Shape dough to plate and trim away excess. Add bread crumbs and pat to adhere.
To prepare filling: Drain peaches and coat them with cornstarch. Pour into pie plate. Preheat oven to 400°.
To make top layer of crust:
Roll out smaller piece of dough so that it is roughly 10" wide. Place on top of peaches. Tuck top layer's edges under bottom layer's and crimp with fingers. Make slits in top. Bake for 45 minutes.
Subscribe to:
Posts (Atom)


