The Best Bread on Earth
12/13/09: Meatballs in Tomato Sauce with St. Joseph's Day Bread
Sorry for the delay in posting! The past month has been a busy one. :)
Meal details: For the main course I stewed store-bought meatballs in our homemade tomato sauce (includes tomatoes, onions, peppers, etc. straight from my family's farm). Alongside the meatballs I served fresh St. Joseph's Day Bread.
Defining moments: None for this week. I specifically chose these two dishes just because I knew I would be familiar with them! I didn't want to do anything difficult this time because I knew I would be spending a good amount of time baking in the next couple of weeks.
Recipe sources: The meatballs were really a no-brainer--just tomato sauce and meatballs in a pot. :) The St. Joseph's Day Bread is a recipe I've done before and it actually came from a calendar I received last Christmas. You can find the recipe here.
What I learned: Tried to keep it simple so I believe nothing new was learned this time.
Any modifications? No.
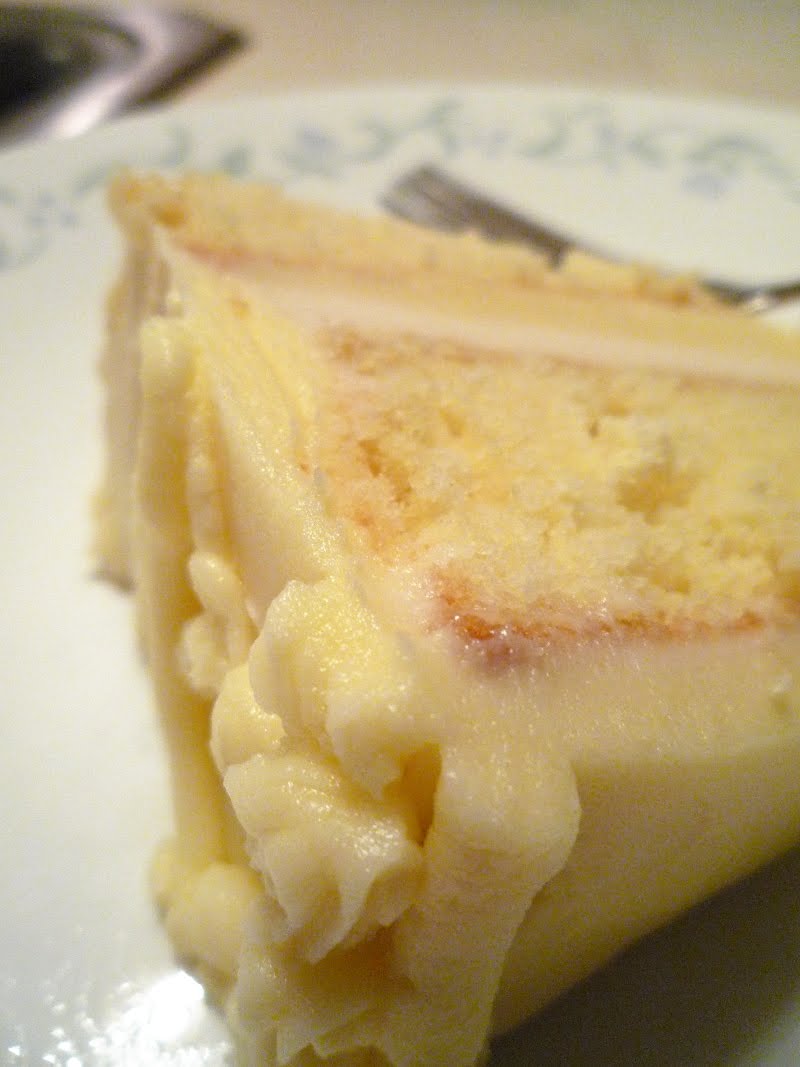
How it tasted? Unbelievably good! ;) The bread was warm, moist and just the perfect side for the flavorful meatballs in our sauce. Thanks big sis for pushing me to do St. Joseph's Day Bread again!
How about a 2nd time? Definitely. These two work very well together.

Ah, warm St. Joseph's Day Bread straight from the oven. He had a little splitting problem but it didn't at all effect the flavor!


Don't ya worry, I'll keep up with the posting!
Sorry for the delay in posting! The past month has been a busy one. :)
Meal details: For the main course I stewed store-bought meatballs in our homemade tomato sauce (includes tomatoes, onions, peppers, etc. straight from my family's farm). Alongside the meatballs I served fresh St. Joseph's Day Bread.
Defining moments: None for this week. I specifically chose these two dishes just because I knew I would be familiar with them! I didn't want to do anything difficult this time because I knew I would be spending a good amount of time baking in the next couple of weeks.
Recipe sources: The meatballs were really a no-brainer--just tomato sauce and meatballs in a pot. :) The St. Joseph's Day Bread is a recipe I've done before and it actually came from a calendar I received last Christmas. You can find the recipe here.
What I learned: Tried to keep it simple so I believe nothing new was learned this time.
Any modifications? No.
How it tasted? Unbelievably good! ;) The bread was warm, moist and just the perfect side for the flavorful meatballs in our sauce. Thanks big sis for pushing me to do St. Joseph's Day Bread again!
How about a 2nd time? Definitely. These two work very well together.

Ah, warm St. Joseph's Day Bread straight from the oven. He had a little splitting problem but it didn't at all effect the flavor!


Don't ya worry, I'll keep up with the posting!
A Cake for Mary -- Immaculate Heart Cake
12/08/09: Immaculate Heart Cake in honor of the Feast of the Immaculate Conception (Dec. 8)
Dessert Details: I don't often get a chance to bake/cook outside my Sunday time slot, but this week was an exception. December 8 is the Feast of the Immaculate Conception of Mary, and the day just had to have a cake to help celebrate. I made a three layer devils food cake that was frosted with Traditional Chocolate Buttercream, Traditional Buttercream, and a Creamy White Icing was used for the filling.
I also made this cake because Duff Goodman, the host of The Ace of the Cakes on Food Network, was the next chef in line for me. I am a member of the Food Network Chef Cooking Challenge that is being hosted by the writer of the I Blame My Mother blog. Learn more about this fun challenge here.
The Creamy White Icing came from the 1950 edition of Betty Crocker's Picture Cookbook. Here is the recipe:
Creamy White Icing
Ingredients:
Melt shortening and butter in saucepan. Remove from heat and blend in flour and salt. Stir milk in slowly. Bring to a boil, stirring constantly. Boil 1 minute. Remove from heat and stir in sugar and vanilla. Beat until right consistency to spread. Yield: 1 1/2 cups.
So bring on the cake. . .


There was a lot of carving involved when making this cake. But the scraps didn't go to waste, I placed them all into a 9" square pan and made a "crumb" cake. :) Everyone liked it!


This was my first attempt at making buttercream roses.

Dessert Details: I don't often get a chance to bake/cook outside my Sunday time slot, but this week was an exception. December 8 is the Feast of the Immaculate Conception of Mary, and the day just had to have a cake to help celebrate. I made a three layer devils food cake that was frosted with Traditional Chocolate Buttercream, Traditional Buttercream, and a Creamy White Icing was used for the filling.
I also made this cake because Duff Goodman, the host of The Ace of the Cakes on Food Network, was the next chef in line for me. I am a member of the Food Network Chef Cooking Challenge that is being hosted by the writer of the I Blame My Mother blog. Learn more about this fun challenge here.
The Creamy White Icing came from the 1950 edition of Betty Crocker's Picture Cookbook. Here is the recipe:
Creamy White Icing
Ingredients:
- 3 tbsp. shortening
- 3 tbsp. butter
- 2 tbsp. flour
- 1/8 tsp. salt
- 6 tbsp. milk
- 2 1/4 cups sifted confectioners' sugar
- 1/3 tsp. vanilla
Melt shortening and butter in saucepan. Remove from heat and blend in flour and salt. Stir milk in slowly. Bring to a boil, stirring constantly. Boil 1 minute. Remove from heat and stir in sugar and vanilla. Beat until right consistency to spread. Yield: 1 1/2 cups.
So bring on the cake. . .


There was a lot of carving involved when making this cake. But the scraps didn't go to waste, I placed them all into a 9" square pan and made a "crumb" cake. :) Everyone liked it!


This was my first attempt at making buttercream roses.

Time to Enter the Lab - First Kitchen Chemistry Recipe This Week
12/06/09: Chicken a la Polly Kohen over Rice and. . . Guacamole?
Meal details: For the main course I made Chicken a la Polly Kohen which is a dish containing seared-then-baked chicken with chili sauce, pineapples, and raisins. The guacamole was a little side I made for the meal. A very strange addition to the scene, but I needed to make it for my Kitchen Chemistry class.
Defining moments: My first time doing a recipe for Kitchen Chemistry. Yay! In order to make the guacamole I needed avocados, so this was the first time I ever saw or tasted them.
Recipe sources: The chicken recipe was is from Dave Lieberman, the host of the Food Network show: Good Deal with Dave Lieberman. The recipe has such a strange name because Dave named it after his grandmother--Polly Kohen. I chose a recipe from him because I am participating in the Food Network Chef Cooking Challenge that is being hosted by the writer of the I Blame My Mother blog. Learn more about this fun challenge by clicking here. I remember watching Dave's show when it first came out, but I haven't caught it on T.V. lately. Is this show still running? Please leave a comment if you know.
The guacamole recipe came from my Kitchen Chemistry class; here it is:
Guacamole
Ingredients:
Avocados (I used two)
Small onion, finely minced
Lemon juice from a lemon
Salt to taste (about 1 tsp. to 1 tbsp.)
Instructions:
Cut open the avocados, remove the pit, scoop out the flesh and mush them up. Add the lemon juice and mix well. Add the minced onions. Add salt to taste. Add 1 teaspoon at a time and taste after mixing well. Serve with tortilla chips. Other things you can add to the guacamole are hot sauce, tomatoes, salsa, and limes instead of lemons.
What I learned: The chicken was pretty straightforward, I didn't pick up anything new along the way. Oh wait, there is one thing. Papa said he would like the chicken breasts to have an internal temperature of 175F and the drumsticks to have 190F.
The guacamole was another story. I gathered a lot of information about avocados and the reasons why their flesh turns brown, how they ripen, their history, and so on. I learned that you should never place a green avocado in the refrigerator, it will never ripen! Avocados should always be placed at room temperature to ripen, and you know they're ripe by the color of the skin (it should be black), and the way the fruit yields to pressure (if it is a bit 'squishy' you know the fruit has reached its ripe 'perfection'). To help prevent the guacamole from turning brown add lemon juice to the mix and cover the surface with plastic wrap. This method worked for me.Any modifications? Yes. I made some to the chicken recipe; here is what I did. . .
My ingredient list for Chicken a la Polly Kohen x 2; my modifications are in red:
I followed the recipe instructions precisely and I have to say that their times matched mine pretty well. And a quick side note: I used two steamer trays for the chicken.
How it tasted? The chicken was remarkably good, wasn't sure what to expect with raisins, chili sauce, and pineapple! But they all worked well together; I very nice surprise. Now I know the reasons for the rave reviews on the Food Network websites.
The guacamole also tasted good. I never thought I would have this staple dip in a millionaire years!
How about a 2nd time? Yes, I would make both dishes again.


Thanks Dave for the awesome recipe!


Meal details: For the main course I made Chicken a la Polly Kohen which is a dish containing seared-then-baked chicken with chili sauce, pineapples, and raisins. The guacamole was a little side I made for the meal. A very strange addition to the scene, but I needed to make it for my Kitchen Chemistry class.
Defining moments: My first time doing a recipe for Kitchen Chemistry. Yay! In order to make the guacamole I needed avocados, so this was the first time I ever saw or tasted them.
Recipe sources: The chicken recipe was is from Dave Lieberman, the host of the Food Network show: Good Deal with Dave Lieberman. The recipe has such a strange name because Dave named it after his grandmother--Polly Kohen. I chose a recipe from him because I am participating in the Food Network Chef Cooking Challenge that is being hosted by the writer of the I Blame My Mother blog. Learn more about this fun challenge by clicking here. I remember watching Dave's show when it first came out, but I haven't caught it on T.V. lately. Is this show still running? Please leave a comment if you know.
The guacamole recipe came from my Kitchen Chemistry class; here it is:
Guacamole
Ingredients:
Avocados (I used two)
Small onion, finely minced
Lemon juice from a lemon
Salt to taste (about 1 tsp. to 1 tbsp.)
Instructions:
Cut open the avocados, remove the pit, scoop out the flesh and mush them up. Add the lemon juice and mix well. Add the minced onions. Add salt to taste. Add 1 teaspoon at a time and taste after mixing well. Serve with tortilla chips. Other things you can add to the guacamole are hot sauce, tomatoes, salsa, and limes instead of lemons.
What I learned: The chicken was pretty straightforward, I didn't pick up anything new along the way. Oh wait, there is one thing. Papa said he would like the chicken breasts to have an internal temperature of 175F and the drumsticks to have 190F.
The guacamole was another story. I gathered a lot of information about avocados and the reasons why their flesh turns brown, how they ripen, their history, and so on. I learned that you should never place a green avocado in the refrigerator, it will never ripen! Avocados should always be placed at room temperature to ripen, and you know they're ripe by the color of the skin (it should be black), and the way the fruit yields to pressure (if it is a bit 'squishy' you know the fruit has reached its ripe 'perfection'). To help prevent the guacamole from turning brown add lemon juice to the mix and cover the surface with plastic wrap. This method worked for me.Any modifications? Yes. I made some to the chicken recipe; here is what I did. . .
My ingredient list for Chicken a la Polly Kohen x 2; my modifications are in red:
- 4 tablespoons vegetable oil
- 2 (3 to 4-pound) whole chicken, quartered I used 15 drumsticks and 3 breasts instead
- Kosher Salt
- Freshly ground black pepper
- 2 small onion, medium diced
- 4 to 6 cloves garlic, minced
- 24-ounces chili sauce I used 36 oz. (three jars) of chili sauce, because we love our sauce
- 1 cup raisins
- 1 cup dark brown sugar
- 1 cup sherry
- 1/2 cup water I didn't add water, I thought the sauce was too thin. I'm glad I didn't, because the finished consistency was perfect
- 16-ounces canned pineapple chunks with half the juice from the can I used a 20 oz. can
I followed the recipe instructions precisely and I have to say that their times matched mine pretty well. And a quick side note: I used two steamer trays for the chicken.
How it tasted? The chicken was remarkably good, wasn't sure what to expect with raisins, chili sauce, and pineapple! But they all worked well together; I very nice surprise. Now I know the reasons for the rave reviews on the Food Network websites.
The guacamole also tasted good. I never thought I would have this staple dip in a millionaire years!
How about a 2nd time? Yes, I would make both dishes again.

The blue plate used above is actually the prop for my blog's header.
I love this plate!
I love this plate!


Thanks Dave for the awesome recipe!


Guacamole, aka, Yoda dip. ;)
For the Sake of Cake : Cake Decorating Fun
This past month and a half I've been looking into cake decorating because I believe it is something I could do for fun and I so do LOVE cake. :) I'm going to write down here what I've learned and discovered so far and maybe someone who is reading this may pick up a few ideas, too.
What Type of Cake Should I Make? : At the beginning I needed to decide on what I should learn first, so I asked my siblings what they thought was the prettiest and most appetizing cake they have seen. They all agreed that simple piping was theirs. I wanted to make sure I added appetizing as an adjective because I didn't want to scare away my eaters! A lot of the cakes I see featured on The Ace of Cakes (Food Network) and The Cake Boss (TLC) are nice to look at, but I have a hard time picturing myself eating one. Sorry Duff and Buddy! I like the look of simple piping and both dainty and elaborate flowers, so I decided to learn these two techniques first.
Decorating Supplies : Before this past November there was really no cake decorating supplies in the house. Not one single pastry bag to be found! So my parents bought me some supplies (isn't that so nice of them?) from BakersNook.com. Here are the supplies I selected and my thoughts on each:

3 pastry bags, Ateco brand - a 10" polyurethane version, a 12" plastic coated canvas one, and a 16" 'Flex.' The 10" bag is kind of slippery when piping but it is the easiest one to clean. The 12" bag is a lot easier to pipe with and it fits in my hand nicely; isn't easy to clean because the canvas is stiff. I haven't tried out the 'Flex' bag but I'm thinking it will be the easiest to use and clean, just by the looks of it. It also has a handy loop for hanging.

7 different piping tips, Wilton brand - Basketweave 47, Drop Flower 1B, Open Star 18, Petal 104, Round 12, Round 3, and Round 6. I tried all of these out except for the Drop Flower. All of them are easy to use and you can place them in the dishwasher. Very nice! I don't think I would change my tip set except to add a larger Open Star. The Petal 104 is my favorite tip because it allows me to make flower petals; can't live without it.

Coupler with Rings, CK brand - A coupler is a plastic object that has threads (like a screw) that you insert in the pastry bag before adding the frosting. You then place your piping tip on top of the coupler from the outside of the bag, and screw it in place using a coupler ring. This allows me to interchange piping tips without emptying the bag's contents.

13" Offset Spatula, Ateco brand - I selected this item to help me spread the frosting on the cake and to load the pastry bag. It is heavy-duty and well made.

Clear Imitation Butter Flavoring, 4 oz, CK brand - This butter flavoring comes in use when I make a buttercream entirely out of shortening. I would use 100% shortening when I make a frosting that is pure white. I just recently used this product in my buttercream and it tastes just like butter!

Liquid Glucose, 16 oz., CK brand - Used in making ready to roll fondant. Haven't used this yet.

Glycerin, Wilton brand - Used in making fondant.

Meringue Powder, 4 oz., Baker's Nook product - Commonly used in royal icing but I also found it to be a great addition to buttercream. It stabilizes the frosting.

Tylose Gum Paste Powder, CK brand - Used in making gum paste. Haven't used this yet.

Flower Nail No. 7, Wilton brand - A handy tool when making buttercream roses and other flowers. Here is a picture of the flower nail sitting next to the tip that makes rose petals:

I really can't just take a look at a cake recipe and know then and there what it will be like. But I am doing a course in kitchen chemistry for school so maybe I will have that skill soon. I am definitely looking forward to that! :)
Finding the Right Frosting Recipe : I knew from the start that I wanted to make all my frosting and other cake 'mediums' (i.e. fondant, gum paste, etc.), from scratch so I began searching for the perfect recipes. Here is what I found:
Traditional Buttercream (TB) from DesignMeACake.com - I came across this recipe by searching on YouTube. The cake decorator, Edna, is very talented and I enjoy her videos a lot. I've made this buttercream two times so far and it has been the silkiest buttercream I've tasted, even after 2 days in the refrigerator. It doesn't crust up as fast as some other buttercreams I've tried; that is always nice when spending a long time piping.
Made any modifications to this recipe? No, I followed it exactly. But I did notice a typo in the ingredient section (merengue should be meringue) and the recipe author forgot to mention the meringue powder in the instructions. You should add the meringue to the powdered sugar.
Storing time: Can be stored up to 2 weeks in fridge.
Swiss Meringue Buttercream (SMB) from DyannBakes.com - This is a cooked buttercream that uses egg whites. It is not as sweet as the TB and my family likes it that way. I also found this recipe on YouTube and it is very easy to make. It uses a lot more butter than the recipe above, but it uses less sugar.
Made any modifications to this recipe? Yes. The creator of this recipe said to cook the egg whites and sugar until they reach 140 F or until the sugar has dissolved. I've learned from different sources that the egg whites are not cooked until the temperature of 160 F. I decided to do 160 degrees to play it safe.
Storing time: It can stored in the fridge for up to one week.
I found other recipes for fondant, gum paste, and royal icing and will post about them as soon as I try them out.
Baking the Cake - What is the Best Way to Grease My Cake Pan? : For a couple years now I've always greased my cake pans using a butter flavored vegetable spray. Why? Because I grease everything else this way (bread bowls, muffin pans. . . You name it, I sprayed it), and it is the easiest way I can think of. The cake comes out easily sometimes but those other times can prove to be very frustrating. Annemarie told me that the traditional butter and flour method works the best. So the last time I made a cake--which required three layers of a devil's food--I tried three different methods. One, butter and flour; two, butter and coco powder; and three, parchment paper on the bottom with butter and flour on the sides. And the conclusion was. . . the parchment paper cake slid right out like it was no one's business! :) Next in the performance line was the butter and flour, it came out cleanly but only after some beating. Unfortunately, the butter and coco died a miserable death. Live and learn.
Baking the Cake - Removing the Cake from the Oven : As soon as the cake is ready (a toothpick comes out clean when inserted into the middle of the cake), I take it out of the oven and transfer it to a wire rack. A wire rack allows air underneath the cake pan so the pans cools down faster. I let the cake sit in its pan for ten minutes before I remove it from the pan. I take a knife, run it along the cake's perimeter, place another wire rack on top of the cake, invert the cake while still holding the rack, give the pan's bottom a few taps with the knife handle, and if I played my cards right, the cake usually slips right out. I let the cake sit on the rack for another ten minutes then I invert it to its upright position. This is to help prevent the cake from splitting because the bottom of the cake is sturdier than the top.
Storing the Cake Before it is Decorated : After the cake is cool to the touch, I wrap it up in plastic wrap and place it in the fridge. What really works well for me is baking the cake the evening before the day of decorating, this gives me a lot more time and a nice chilled cake.
Getting Ready to Decorate : I like to move my chilled cake to a cake board and then move it to my cake plate, and frost it there. After the cake is frosted I move the cake off the plate, clean the plate from my frosting "oopsy" moments, then transfer the cake back onto the plate by slipping a long spatula under the cake to lift it off the cake board.
So what is a cake board, and what is it made of? It is usually made of cardboard with a wax coating. Instead of purchasing one I made my own using two rounds of medium weight cardboard covered with non-stick aluminum foil. It works very well and best of all: it's free!
Decorating the Cake : The first time I piped with buttercream I noticed that it was getting runny and my piping was getting very sloppy. I learned that the frosting was melting because of the heat of my hands so I placed the bag in the refrigerator for a couple minutes. That is why it is so helpful to alternate between two piping bags, one can be kept in the fridge while the other is in use.
When filling a pastry bag with frosting sometimes the frosting ends up on the outside. You can prevent this by folding over the edge about two inches, picking up a bit of frosting on the end of a spatula, and inserting the frosting as near to the piping tip as possible. And when you are piping, you should always give the bag a quick twist to stop the frosting from coming up to the top of the bag.
There are so many other things to talk about when it comes to cake! I hope to write up another post on the oh-so-yummy topic soon!
What Type of Cake Should I Make? : At the beginning I needed to decide on what I should learn first, so I asked my siblings what they thought was the prettiest and most appetizing cake they have seen. They all agreed that simple piping was theirs. I wanted to make sure I added appetizing as an adjective because I didn't want to scare away my eaters! A lot of the cakes I see featured on The Ace of Cakes (Food Network) and The Cake Boss (TLC) are nice to look at, but I have a hard time picturing myself eating one. Sorry Duff and Buddy! I like the look of simple piping and both dainty and elaborate flowers, so I decided to learn these two techniques first.
Decorating Supplies : Before this past November there was really no cake decorating supplies in the house. Not one single pastry bag to be found! So my parents bought me some supplies (isn't that so nice of them?) from BakersNook.com. Here are the supplies I selected and my thoughts on each:

3 pastry bags, Ateco brand - a 10" polyurethane version, a 12" plastic coated canvas one, and a 16" 'Flex.' The 10" bag is kind of slippery when piping but it is the easiest one to clean. The 12" bag is a lot easier to pipe with and it fits in my hand nicely; isn't easy to clean because the canvas is stiff. I haven't tried out the 'Flex' bag but I'm thinking it will be the easiest to use and clean, just by the looks of it. It also has a handy loop for hanging.

7 different piping tips, Wilton brand - Basketweave 47, Drop Flower 1B, Open Star 18, Petal 104, Round 12, Round 3, and Round 6. I tried all of these out except for the Drop Flower. All of them are easy to use and you can place them in the dishwasher. Very nice! I don't think I would change my tip set except to add a larger Open Star. The Petal 104 is my favorite tip because it allows me to make flower petals; can't live without it.

Coupler with Rings, CK brand - A coupler is a plastic object that has threads (like a screw) that you insert in the pastry bag before adding the frosting. You then place your piping tip on top of the coupler from the outside of the bag, and screw it in place using a coupler ring. This allows me to interchange piping tips without emptying the bag's contents.

13" Offset Spatula, Ateco brand - I selected this item to help me spread the frosting on the cake and to load the pastry bag. It is heavy-duty and well made.

Clear Imitation Butter Flavoring, 4 oz, CK brand - This butter flavoring comes in use when I make a buttercream entirely out of shortening. I would use 100% shortening when I make a frosting that is pure white. I just recently used this product in my buttercream and it tastes just like butter!

Liquid Glucose, 16 oz., CK brand - Used in making ready to roll fondant. Haven't used this yet.

Glycerin, Wilton brand - Used in making fondant.

Meringue Powder, 4 oz., Baker's Nook product - Commonly used in royal icing but I also found it to be a great addition to buttercream. It stabilizes the frosting.

Tylose Gum Paste Powder, CK brand - Used in making gum paste. Haven't used this yet.

Flower Nail No. 7, Wilton brand - A handy tool when making buttercream roses and other flowers. Here is a picture of the flower nail sitting next to the tip that makes rose petals:

Here is my review of Baker's Nook:
- Selection? Baker's Nook has a very large selection of supplies for not just cake decorating but also for candy making, cookies, brownies, cupcakes, and lots of other yummy confections.
- Prices? Before deciding on purchasing from Baker's Nook, I wanted to compare their prices with some other cake supply websites. I couldn't find any other website that offered such prices and selection as Baker's Nook does--and believe me, I looked! ;)
- Customer Service? I emailed Baker's Nook once about a product's country of origin and they replied in less than a day and gave me the necessary info. Their website also includes a very handy chat feature which I used a lot before ordering.
- Ordering experience? My parents ordered for me. Had a bit of a hassle checking out (the first attempt failed). Would only give them 2 stars for ordering experience this first time.
I really can't just take a look at a cake recipe and know then and there what it will be like. But I am doing a course in kitchen chemistry for school so maybe I will have that skill soon. I am definitely looking forward to that! :)
Finding the Right Frosting Recipe : I knew from the start that I wanted to make all my frosting and other cake 'mediums' (i.e. fondant, gum paste, etc.), from scratch so I began searching for the perfect recipes. Here is what I found:
Traditional Buttercream (TB) from DesignMeACake.com - I came across this recipe by searching on YouTube. The cake decorator, Edna, is very talented and I enjoy her videos a lot. I've made this buttercream two times so far and it has been the silkiest buttercream I've tasted, even after 2 days in the refrigerator. It doesn't crust up as fast as some other buttercreams I've tried; that is always nice when spending a long time piping.
Made any modifications to this recipe? No, I followed it exactly. But I did notice a typo in the ingredient section (merengue should be meringue) and the recipe author forgot to mention the meringue powder in the instructions. You should add the meringue to the powdered sugar.
Storing time: Can be stored up to 2 weeks in fridge.
Swiss Meringue Buttercream (SMB) from DyannBakes.com - This is a cooked buttercream that uses egg whites. It is not as sweet as the TB and my family likes it that way. I also found this recipe on YouTube and it is very easy to make. It uses a lot more butter than the recipe above, but it uses less sugar.
Made any modifications to this recipe? Yes. The creator of this recipe said to cook the egg whites and sugar until they reach 140 F or until the sugar has dissolved. I've learned from different sources that the egg whites are not cooked until the temperature of 160 F. I decided to do 160 degrees to play it safe.
Storing time: It can stored in the fridge for up to one week.
I found other recipes for fondant, gum paste, and royal icing and will post about them as soon as I try them out.
Baking the Cake - What is the Best Way to Grease My Cake Pan? : For a couple years now I've always greased my cake pans using a butter flavored vegetable spray. Why? Because I grease everything else this way (bread bowls, muffin pans. . . You name it, I sprayed it), and it is the easiest way I can think of. The cake comes out easily sometimes but those other times can prove to be very frustrating. Annemarie told me that the traditional butter and flour method works the best. So the last time I made a cake--which required three layers of a devil's food--I tried three different methods. One, butter and flour; two, butter and coco powder; and three, parchment paper on the bottom with butter and flour on the sides. And the conclusion was. . . the parchment paper cake slid right out like it was no one's business! :) Next in the performance line was the butter and flour, it came out cleanly but only after some beating. Unfortunately, the butter and coco died a miserable death. Live and learn.
Baking the Cake - Removing the Cake from the Oven : As soon as the cake is ready (a toothpick comes out clean when inserted into the middle of the cake), I take it out of the oven and transfer it to a wire rack. A wire rack allows air underneath the cake pan so the pans cools down faster. I let the cake sit in its pan for ten minutes before I remove it from the pan. I take a knife, run it along the cake's perimeter, place another wire rack on top of the cake, invert the cake while still holding the rack, give the pan's bottom a few taps with the knife handle, and if I played my cards right, the cake usually slips right out. I let the cake sit on the rack for another ten minutes then I invert it to its upright position. This is to help prevent the cake from splitting because the bottom of the cake is sturdier than the top.
Storing the Cake Before it is Decorated : After the cake is cool to the touch, I wrap it up in plastic wrap and place it in the fridge. What really works well for me is baking the cake the evening before the day of decorating, this gives me a lot more time and a nice chilled cake.
Getting Ready to Decorate : I like to move my chilled cake to a cake board and then move it to my cake plate, and frost it there. After the cake is frosted I move the cake off the plate, clean the plate from my frosting "oopsy" moments, then transfer the cake back onto the plate by slipping a long spatula under the cake to lift it off the cake board.
So what is a cake board, and what is it made of? It is usually made of cardboard with a wax coating. Instead of purchasing one I made my own using two rounds of medium weight cardboard covered with non-stick aluminum foil. It works very well and best of all: it's free!
Decorating the Cake : The first time I piped with buttercream I noticed that it was getting runny and my piping was getting very sloppy. I learned that the frosting was melting because of the heat of my hands so I placed the bag in the refrigerator for a couple minutes. That is why it is so helpful to alternate between two piping bags, one can be kept in the fridge while the other is in use.
When filling a pastry bag with frosting sometimes the frosting ends up on the outside. You can prevent this by folding over the edge about two inches, picking up a bit of frosting on the end of a spatula, and inserting the frosting as near to the piping tip as possible. And when you are piping, you should always give the bag a quick twist to stop the frosting from coming up to the top of the bag.
There are so many other things to talk about when it comes to cake! I hope to write up another post on the oh-so-yummy topic soon!
My Discovery of Yorkshire Pudding and My First Ever Advent Cake
11/29/09: Tomato Soup Paired with Mini Yorkshire Pudding and Gold Cake for Dessert
Meal details: For the main course I heated 1 1/2 quarts of homemade tomato soup from the freezer and baked some Yorkshire Pudding to eat alongside. For dessert, I made a Gold Cake, filled it with Swiss Meringue Buttercream and traditional buttercream, and frosted an Advent candle on top in honor of it being the First Sunday of the Advent Season.
Defining moments: First time for making and tasting Yorkshire Pudding. Before this week I never even knew what Yorkshire Pudding was! I've heard the name here and there but I always imagined it to be, well, pudding. As in, Jell-O pudding. ;) This was also a memorable Sunday because I frosted a cake using lots of different techniques, piping tips, and frostings.
Recipe sources: The Mini Yorkshire Pudding recipe was created by Danny Boome, the host of Rescue Chef, and came from the Food Network website. I chose this recipe because I am cooking along with the members of the Food Network Chef Cooking Challenge that is being hosted by the writer of the I Blame My Mother blog. Learn more about this fun challenge by clicking here.
The Gold Cake recipe came from Betty Crocker's Picture Cook Book, copyright 1950. The recipe, which has been rephrased by me, follows:
Gold Cake
Yield: 2 9" layer pans or 13x9" oblong pan
Ingredients:
Instructions:
Preheat oven to 350F.
Grease and flour cake pans. Cream shortening, butter, and sugar together until fluffy. Blend in egg yolks. In another bowl, sift together flour, baking powder, and salt. In a measuring cup, combine milk, lemon extract, and vanilla. Add dry ingredients and milk mixture alternately to shortening mixture until cake batter is smooth. Pour into cake pans and bake for 25 to 30 minutes for layers OR 35 to 40 minutes for 13x9 pan. Test doneness of cake by inserting toothpick into center of cake; if it comes out clean the cake is done.
I used two kinds of frosting to make this cake. One is called Swiss Meringue Buttercream and the other is a traditional type of buttercream, made with butter, powdered sugar, and milk.
To me, and a good portion of my family, traditional buttercream is a bit too sweet and that is why I wanted to try out a new kind of frosting. The Swiss Meringue recipe was created by DyannBakes.com and I discovered it on YouTube. Visit this website to print out the recipe and view the embedded video. I made a modification to this recipe so please read on to learn more.
The traditional buttercream recipe was also discovered on YouTube and was created by DesignMeACake.com. Take a look at the recipe and video by clicking here. A quick note about this recipe: I noticed that the author of this recipe forget to mention the meringue powder in the written instructions. She does, however, mention it on the video. So for those who are interested in giving this one a go: add the meringue powder to the powdered sugar before mixing it with the butter and shortening.
What I learned: Let me first begin with the Yorkshire Pudding. When I first read through the recipe and looked at the comments it appeared to me that the recipe did not include all the hints and tips from the T.V. show. Too bad I didn't catch it on T.V.! Oh well. I still wanted to try them out so I decided to look around on some websites and blogs to see what other people are doing. I am so glad I did because I learned a lot of valuable information like using oil to grease the muffin pan instead of butter and using 3" wide muffin pans. I should always research the recipe before I try it out!
Now for dessert. Past couple of weeks I have been doing a lot of research on cake decorating and different types of frosting. Here are a couple tips I've accumulated:
A learned a lot more tips and I hope to type a separate post for this. Be expecting it soon! ;D
Any modifications? Yes. I made some to the Yorkshire Pudding and the Swiss Meringue.
For the Pudding--Instead of using butter to grease the muffin pans, I quickly sprayed the pans with cooking spray and filled each muffin hole with a 1/2 teaspoon of vegetable oil. And the puddings only took 25 minutes to bake.
For the Swiss Meringue--The recipe says to cook the egg whites and sugar until they reach the temperature of 140F. I learned from various sites that egg whites are not cooked until they reach 160F. Read this site to learn more. I want to play it safe, so 160 is my recommendation!
How it tasted? The "Yorkies" were light and had an almost creamy texture. They went very well with the homemade tomato soup, which by the way, my brother thought tasted better than when I first served it. Aw. The Yorkies had no trouble rising for me and I am still perplexed on how they actually rise when there is no leavening agent to be seen. I just started a Kitchen Chemistry class so maybe I'll be learning that bit of science in the near future.
The cake was liked by all, both in flavor and appearance! Yay! It is nice to have that happen after spending a lot of time studying cake decorating. I think it was a good move to use both the Swiss Meringue Buttercream and the traditional kind, because the latter tends to be overly sweet and can overpower the cake. My Papa says to make a chocolate Swiss Meringue next time--just what I was thinking. ;)
How about a 2nd time? Yes. Annemarie said we need to have the Yorkies with gravy, sounds like a plan to me.

Here are my Yorkshire Puddings and not a Jell-O box in sight!


A purple candle in honor of the First Sunday of Advent.


The frosting is ivory in color because I used colored vanilla extract. To achieve a white, white frosting, use clear extract of your choice.

This cake has a lovely gold color because of the addition of egg yolks.

Watching hours of Ace of Cakes, Food Network Cake Challenges, and Cake Boss has finally paid off.
Meal details: For the main course I heated 1 1/2 quarts of homemade tomato soup from the freezer and baked some Yorkshire Pudding to eat alongside. For dessert, I made a Gold Cake, filled it with Swiss Meringue Buttercream and traditional buttercream, and frosted an Advent candle on top in honor of it being the First Sunday of the Advent Season.
Defining moments: First time for making and tasting Yorkshire Pudding. Before this week I never even knew what Yorkshire Pudding was! I've heard the name here and there but I always imagined it to be, well, pudding. As in, Jell-O pudding. ;) This was also a memorable Sunday because I frosted a cake using lots of different techniques, piping tips, and frostings.
Recipe sources: The Mini Yorkshire Pudding recipe was created by Danny Boome, the host of Rescue Chef, and came from the Food Network website. I chose this recipe because I am cooking along with the members of the Food Network Chef Cooking Challenge that is being hosted by the writer of the I Blame My Mother blog. Learn more about this fun challenge by clicking here.
The Gold Cake recipe came from Betty Crocker's Picture Cook Book, copyright 1950. The recipe, which has been rephrased by me, follows:
Gold Cake
Yield: 2 9" layer pans or 13x9" oblong pan
Ingredients:
- 1/4 cup soft shortening
- 1/4 butter
- 1 2/3 cups granulated sugar
- 5 egg yolks (3/8 cup), beaten until thick
- 2 1/2 cups sifted cake flour OR 2 1/3 cups sifted all-purpose flour
- 2 1/2 tsp. baking powder
- 1 tsp. salt
- 1 cup milk
- 1 tsp. lemon extract
- 1/2 tsp. vanilla
Instructions:
Preheat oven to 350F.
Grease and flour cake pans. Cream shortening, butter, and sugar together until fluffy. Blend in egg yolks. In another bowl, sift together flour, baking powder, and salt. In a measuring cup, combine milk, lemon extract, and vanilla. Add dry ingredients and milk mixture alternately to shortening mixture until cake batter is smooth. Pour into cake pans and bake for 25 to 30 minutes for layers OR 35 to 40 minutes for 13x9 pan. Test doneness of cake by inserting toothpick into center of cake; if it comes out clean the cake is done.
I used two kinds of frosting to make this cake. One is called Swiss Meringue Buttercream and the other is a traditional type of buttercream, made with butter, powdered sugar, and milk.
To me, and a good portion of my family, traditional buttercream is a bit too sweet and that is why I wanted to try out a new kind of frosting. The Swiss Meringue recipe was created by DyannBakes.com and I discovered it on YouTube. Visit this website to print out the recipe and view the embedded video. I made a modification to this recipe so please read on to learn more.
The traditional buttercream recipe was also discovered on YouTube and was created by DesignMeACake.com. Take a look at the recipe and video by clicking here. A quick note about this recipe: I noticed that the author of this recipe forget to mention the meringue powder in the written instructions. She does, however, mention it on the video. So for those who are interested in giving this one a go: add the meringue powder to the powdered sugar before mixing it with the butter and shortening.
What I learned: Let me first begin with the Yorkshire Pudding. When I first read through the recipe and looked at the comments it appeared to me that the recipe did not include all the hints and tips from the T.V. show. Too bad I didn't catch it on T.V.! Oh well. I still wanted to try them out so I decided to look around on some websites and blogs to see what other people are doing. I am so glad I did because I learned a lot of valuable information like using oil to grease the muffin pan instead of butter and using 3" wide muffin pans. I should always research the recipe before I try it out!
Now for dessert. Past couple of weeks I have been doing a lot of research on cake decorating and different types of frosting. Here are a couple tips I've accumulated:
- When piping with buttercream for a few minutes I noticed that it was getting runny and my piping was getting very sloppy. I learned that the frosting was melting because of the heat of my hands so I should place the bag in the refrigerator for a couple minutes. That is why it is so helpful to alternate between two piping bags, one can be kept in the fridge while the other is in use.
- When I am filling a pastry bag with frosting sometimes I wind up with frosting on the outside. To prevent this I should fold over the edge about two inches, pick up a bit of frosting on the end of my spatula, and insert the frosting as near to the piping tip as possible. And when I am piping, I should always give the bag a quick twist to stop the frosting from coming up to the top of the bag.
A learned a lot more tips and I hope to type a separate post for this. Be expecting it soon! ;D
Any modifications? Yes. I made some to the Yorkshire Pudding and the Swiss Meringue.
For the Pudding--Instead of using butter to grease the muffin pans, I quickly sprayed the pans with cooking spray and filled each muffin hole with a 1/2 teaspoon of vegetable oil. And the puddings only took 25 minutes to bake.
For the Swiss Meringue--The recipe says to cook the egg whites and sugar until they reach the temperature of 140F. I learned from various sites that egg whites are not cooked until they reach 160F. Read this site to learn more. I want to play it safe, so 160 is my recommendation!
How it tasted? The "Yorkies" were light and had an almost creamy texture. They went very well with the homemade tomato soup, which by the way, my brother thought tasted better than when I first served it. Aw. The Yorkies had no trouble rising for me and I am still perplexed on how they actually rise when there is no leavening agent to be seen. I just started a Kitchen Chemistry class so maybe I'll be learning that bit of science in the near future.
The cake was liked by all, both in flavor and appearance! Yay! It is nice to have that happen after spending a lot of time studying cake decorating. I think it was a good move to use both the Swiss Meringue Buttercream and the traditional kind, because the latter tends to be overly sweet and can overpower the cake. My Papa says to make a chocolate Swiss Meringue next time--just what I was thinking. ;)
How about a 2nd time? Yes. Annemarie said we need to have the Yorkies with gravy, sounds like a plan to me.

Here are my Yorkshire Puddings and not a Jell-O box in sight!


A purple candle in honor of the First Sunday of Advent.


The frosting is ivory in color because I used colored vanilla extract. To achieve a white, white frosting, use clear extract of your choice.
This cake has a lovely gold color because of the addition of egg yolks.

Watching hours of Ace of Cakes, Food Network Cake Challenges, and Cake Boss has finally paid off.
Food Network Challenge Times Two
11/22/09: Chorizo-and-Potato Taquitos and Millionaire Shortbread
Meal details: For the main course I made taquitos that were stuffed with chorizo sausage, potato, onions, peppers, and queso fresco cheese. For dessert we had shortbread squares that had layers of caramel and chocolate.
Defining moments: First time for me to make taquitos (only have heated frozen taquitos from the store up till now) and this is also the first time I used chorizo sausage and queso fresco cheese.
Recipe sources: I am part of the Food Network Chefs Cooking Challenge that is being hosted by the writer of the I Blame My Mother blog. (Learn more about this fun challenge by visiting this page.) Because I am two chefs behind I decided to do two recipes from the Food Network chefs to catch up with the rest of the members. The chefs ended up being Claire Robinson (from 5 Ingredient Fix) and Daisy Martinez (from Viva Daisy). I chose Claire's Millionaire Shortbread recipe and Daisy's Taquitos. The taquito recipe is not found on the Food Network website, I actually came across it in an issue of Everyday with Rachael Ray.
What I learned: Gee, making those taquitos was messy! I got frying oil everywhere, so much so, that we had to mop the whole floor. I think I could do a better, cleaner job if I just worked on the kitchen island instead of moving from counter to counter. I will not drip as much oil that way.
I made the taquitos the day before because I knew they would be tedious. After I was done frying I packed them in foil and moved them to the freezer.
I remembered from making chimichangas that tortillas rip and tear when being rolled up so before I began I tried to find some tips to prevent this problem. What I gathered from some sites and the actual recipe in the magazine, is to place them in the microwave or dip them in hot oil prior to the rolling up step. Since we don't have a microwave I went with the latter procedure. It worked fine--no broken tortillas when rolling--but it is because of this extra step that I made an oily mess on the floor. So I am still looking for another way to make these tortillas limber. Any suggestions? If so, please leave a comment!
Onto the Millionaire Shortbread. This recipe was VERY easy to do! The actual shortbread dough is just butter, sugar, salt, and flour that is mixed together with a pastry cutter (or food processor) and dumped into the baking pan. Nothing to it; I probably can do it in my sleep. The only temperamental part of this recipe is making the caramel, which is made of sweetened condensed milk and butter. It is cooked over a medium-high burner and you have to let it boil until it reaches the right color. I'm not really good with determining the "right" from the "wrong" so I just boiled it until it reached the consistency of pudding, which took exactly fifteen minutes. I read on the Food Network website that people were having trouble knowing when the caramel was done--and some even had it turn into a hard mass--so I knew I shouldn't boil it for more than the fifteen minutes that the recipes states. It worked out fine and it was easy to spread.
Any modifications? Yes, I made some to the taquito recipe. Here is my ingredient list for 4 times the recipe:
A quick note: I made one taquito with a flour tortilla and it fried up well and tasted great. I think I will make more when I try this again.
How it tasted? Everyone liked, well, everything. I was very happy to hear that! And what do I think of the two new ingredients? The chorizo sausage was spicy and reminded the family of tamales and the queso fresco cheese is really mild in flavor and it melts super fast. Both ingredients were delicious.
How about a 2nd time? Yes, for both recipes. And next time I will try to cut down on the mess!


Thanks Claire and Daisy for these great recipes!
Meal details: For the main course I made taquitos that were stuffed with chorizo sausage, potato, onions, peppers, and queso fresco cheese. For dessert we had shortbread squares that had layers of caramel and chocolate.
Defining moments: First time for me to make taquitos (only have heated frozen taquitos from the store up till now) and this is also the first time I used chorizo sausage and queso fresco cheese.
Recipe sources: I am part of the Food Network Chefs Cooking Challenge that is being hosted by the writer of the I Blame My Mother blog. (Learn more about this fun challenge by visiting this page.) Because I am two chefs behind I decided to do two recipes from the Food Network chefs to catch up with the rest of the members. The chefs ended up being Claire Robinson (from 5 Ingredient Fix) and Daisy Martinez (from Viva Daisy). I chose Claire's Millionaire Shortbread recipe and Daisy's Taquitos. The taquito recipe is not found on the Food Network website, I actually came across it in an issue of Everyday with Rachael Ray.
What I learned: Gee, making those taquitos was messy! I got frying oil everywhere, so much so, that we had to mop the whole floor. I think I could do a better, cleaner job if I just worked on the kitchen island instead of moving from counter to counter. I will not drip as much oil that way.
I made the taquitos the day before because I knew they would be tedious. After I was done frying I packed them in foil and moved them to the freezer.
I remembered from making chimichangas that tortillas rip and tear when being rolled up so before I began I tried to find some tips to prevent this problem. What I gathered from some sites and the actual recipe in the magazine, is to place them in the microwave or dip them in hot oil prior to the rolling up step. Since we don't have a microwave I went with the latter procedure. It worked fine--no broken tortillas when rolling--but it is because of this extra step that I made an oily mess on the floor. So I am still looking for another way to make these tortillas limber. Any suggestions? If so, please leave a comment!
Onto the Millionaire Shortbread. This recipe was VERY easy to do! The actual shortbread dough is just butter, sugar, salt, and flour that is mixed together with a pastry cutter (or food processor) and dumped into the baking pan. Nothing to it; I probably can do it in my sleep. The only temperamental part of this recipe is making the caramel, which is made of sweetened condensed milk and butter. It is cooked over a medium-high burner and you have to let it boil until it reaches the right color. I'm not really good with determining the "right" from the "wrong" so I just boiled it until it reached the consistency of pudding, which took exactly fifteen minutes. I read on the Food Network website that people were having trouble knowing when the caramel was done--and some even had it turn into a hard mass--so I knew I shouldn't boil it for more than the fifteen minutes that the recipes states. It worked out fine and it was easy to spread.
Any modifications? Yes, I made some to the taquito recipe. Here is my ingredient list for 4 times the recipe:
- 8 medium sized red skinned potatoes, peeled and quartered
- 6 tablespoons vegetable oil, plus more for frying
- 2 pounds Mexican chorizo, casings discarded
- 4 large onion, finely chopped
- One 6 oz. can of tomato paste
- 2 large ancho peppers, chopped
- Salt and pepper
- 12 oz. crumbled queso fresco
- Corn tortillas
A quick note: I made one taquito with a flour tortilla and it fried up well and tasted great. I think I will make more when I try this again.
How it tasted? Everyone liked, well, everything. I was very happy to hear that! And what do I think of the two new ingredients? The chorizo sausage was spicy and reminded the family of tamales and the queso fresco cheese is really mild in flavor and it melts super fast. Both ingredients were delicious.
How about a 2nd time? Yes, for both recipes. And next time I will try to cut down on the mess!


Thanks Claire and Daisy for these great recipes!
Not My Best Showing
11/15/09: Pizza and Apple Pie from Scratch
Meal details: For the main course I made three different types of pizzas: Broccoli and Parmesan, BBQ Chicken, and Traditional. For dessert I made two apple pies, one with Gravenstein apples and the other using apples picked from a wild apple tree growing on our farm.
Defining moments: This would be my first time making apple pie! Can you believe that one?
Recipe sources: I came up with the pizza toppings but I used a recipe created by Cat Cora for the dough. Check it out here. I chose this recipe because I am part of the Food Network Chefs Cooking Challenge that is being hosted by the writer of the I Blame My Mother blog. (Learn more about this fun challenge by visiting this page.)
For the pie now. I made the pie crust using the following recipe that came from The New Antoinette Pope School Cookbook, but I did shorten the instructions significantly.
DOUBLE PIE CRUST
2 ½ cups all-purpose flour -- sifted
3/4 teaspoon baking powder
1 1/2 teaspoons salt
1 cup shortening (we use butter flavored Crisco)
7 tablespoons cold milk (about)
Sift together dry ingredients and with pastry blender, cut in shortening until mixture looks like coarse meal. Add enough milk until dough appears moist but not wet. Try not to use more than 7 tablespoons unless necessary to hold dough together. Turn dough out and knead for a few seconds to hold mixture together. Handle as little as possible. Roll out using your favorite technique.
I didn't follow a recipe for the apple pie filling, I just did what Annemarie usually does. Which is...
Apple Pie Filling:
2 tablespoons flour
8 cups of apple slices *
1/2 cup sugar
3 tablespoons butter
Directions:
Place bottom crust in pan and dust with the flour. Add the apple slices and sprinkle sugar on top, no need to mix. Dot apples with butter. That's all there is to it! No cooking whatsoever.
* I used Gravenstein and a wild apple for my pies this time. For those who are interested in making their own, I suggest using the following varieties: Northern Spy, Idared, Jonathan, and Empire.
What I learned: It was difficult for me to make six, 10" sized pizzas using Cat Cora's pizza dough recipe. There just was not enough dough to work with, and because of this I had to break out a box of pizza dough mix. So if you are going to do this recipe, expect four, 10" sized pizzas or six, 6" sized pizzas. The dough is lovely to work with by the way!
I learned something invaluable this week and that is to bake my apple pies for a longer time! I've only done one type of fruit pie before and that was peach. With a peach pie it is easy to tell when it is done because you just wait until the peach juice bubbles. But this is not so with apple pie. So I was having a hard time deciding when to grab my potholders and I ended up under baking. Oops! :( Next time I will bake them at 350 degrees for 45 minutes and no less.
Any modifications? No, I followed the pizza dough recipe exactly.
How it tasted? The pizza dough was delicious and I liked how thin I rolled it out. Everyone liked the Broccoli and Parmesan pizza the most; the BBQ Chicken came in second.
The pies were just OK namely because of me under baking them. I was really disappointed by that! The wild apple didn't impart enough flavor; won't be using them again.
How about a 2nd time? I will be using the pizza dough recipe again but will double the recipe or just make one large one.

The Broccoli and Parmesan Pizza. I simply brushed the dough with olive oil, pre-baked it for two minutes, added the vegetables and cheese, then placed it back into the oven for 20 minutes at 375.

This is the BBQ Chicken version. I pre-baked the crust for two minutes, added the BBQ sauce, chicken, and mozzarella, then placed it back into the oven.

This is the Traditional Pizza. It is larger than the others and the dough was made using a boxed mix and some of Cat Cora's dough. The toppings are store bought pizza sauce, chicken, and a Monterey Jack/Colby cheese mix.


Mr. Apple Pie, I hope our next meeting shall be more pleasant.
A Modern Twist on Culinary School Staple
11/08/09: Coq Au Vin-guine
Meal Details: The famous French dish, Coq Au Vin, was made this week but it was done with a modern, Italian twist. This new recipe includes chicken breast, Italian red wine, mushrooms, onions, tomato paste, and pasta; hence the "guine" addition to the title.
Defining moments: First time for me to do a Coq Au Vin-like recipe. (By the way, Coq Au Vin translate as "cock with wine.")
Recipe sources: The recipe, that can be found here, was created by Brian Boitano (yes, the ice skater) for his show on Food Network called What Will Brian Boitano Make? I chose this recipe because I am part of the Food Network Chefs Cooking Challenge that is being hosted by the writer of the I Blame My Mother blog. (Learn more about this fun challenge by visiting this page.) I had a rather difficult time deciding to make this dish or not. It included a lot of ingredients and from what I got from the directions, it sounded like it had a lot of steps. I've never seen Brain's show yet so I didn't know at the time if his recipes are that easy to do. But I forgot that I am part of a cooking challenge, and so I took a deep breath and went with it. :)
What I learned: Yes, the recipe directions sounded intense but I learned that this recipe isn't all that hard. The first time around may be a little hectic at times so give yourself extra time; just don't worry, the second attempt will be a whole lot easier. I did not, however, like cubing the chicken breast before it was cooked. I just don't like working with squishy, drippy, raw meat. Ah, another challenge to overcome. :) To help with the cleanup (probably the worst part of dealing with chicken), I cut the chicken on two layers of wax paper that I taped to the counter using masking tape. I use this wax paper/masking tape method a lot when I am kneading dough. So when you are done cutting or kneading, just remove tape and throw away the paper. Fast cleanup!
Any modifications? Yes, I made a lot of ingredient substitutes and amount changes. Here is the ingredient list for two times the recipe with my notes:
How about a 2nd time? Yes, without a doubt.


A couple hours before I tied on my apron, me and my siblings went for a walk around the lakes. Here are some shots.


Had to do the traditional "V" of course! ;)
Meal Details: The famous French dish, Coq Au Vin, was made this week but it was done with a modern, Italian twist. This new recipe includes chicken breast, Italian red wine, mushrooms, onions, tomato paste, and pasta; hence the "guine" addition to the title.
Defining moments: First time for me to do a Coq Au Vin-like recipe. (By the way, Coq Au Vin translate as "cock with wine.")
Recipe sources: The recipe, that can be found here, was created by Brian Boitano (yes, the ice skater) for his show on Food Network called What Will Brian Boitano Make? I chose this recipe because I am part of the Food Network Chefs Cooking Challenge that is being hosted by the writer of the I Blame My Mother blog. (Learn more about this fun challenge by visiting this page.) I had a rather difficult time deciding to make this dish or not. It included a lot of ingredients and from what I got from the directions, it sounded like it had a lot of steps. I've never seen Brain's show yet so I didn't know at the time if his recipes are that easy to do. But I forgot that I am part of a cooking challenge, and so I took a deep breath and went with it. :)
What I learned: Yes, the recipe directions sounded intense but I learned that this recipe isn't all that hard. The first time around may be a little hectic at times so give yourself extra time; just don't worry, the second attempt will be a whole lot easier. I did not, however, like cubing the chicken breast before it was cooked. I just don't like working with squishy, drippy, raw meat. Ah, another challenge to overcome. :) To help with the cleanup (probably the worst part of dealing with chicken), I cut the chicken on two layers of wax paper that I taped to the counter using masking tape. I use this wax paper/masking tape method a lot when I am kneading dough. So when you are done cutting or kneading, just remove tape and throw away the paper. Fast cleanup!
Any modifications? Yes, I made a lot of ingredient substitutes and amount changes. Here is the ingredient list for two times the recipe with my notes:
- 1 cup olive oil, divided
- 1/4 pound pancetta, chopped (I used two tablespoons of leftover bacon grease we have. Brian really only wanted the bacon fat to saute the veggies in.)
- 2 pound cipollini onions, peeled and sliced in 1/2 (I just used three medium sized Sweet Spanish onions that we grow on the farm.)
- 1 cup all-purpose flour
- Salt and freshly ground black pepper
- 2 1/2 pounds boneless skinless chicken breast, cut into bite-size pieces
- 2 pounds crimini mushrooms, sliced (I used 24 oz. of fresh button mushrooms)
- 4 cloves garlic, chopped
- 4 tablespoons tomato paste (I used 6 oz. of tomato paste.)
- 2 bottles medium-bodied Italian red wine
- 6 sprigs fresh thyme, leaves removed
- 2 tablespoon unsalted butter
- 2 pound linguine (I used egg noodless)
- Fresh parsley leaves, roughly chopped (Didn't use this herb, I garnished it with the thyme instead.)
How about a 2nd time? Yes, without a doubt.


A couple hours before I tied on my apron, me and my siblings went for a walk around the lakes. Here are some shots.


Had to do the traditional "V" of course! ;)
Subscribe to:
Posts (Atom)


