My Discovery of Yorkshire Pudding and My First Ever Advent Cake
11/29/09: Tomato Soup Paired with Mini Yorkshire Pudding and Gold Cake for Dessert
Meal details: For the main course I heated 1 1/2 quarts of homemade tomato soup from the freezer and baked some Yorkshire Pudding to eat alongside. For dessert, I made a Gold Cake, filled it with Swiss Meringue Buttercream and traditional buttercream, and frosted an Advent candle on top in honor of it being the First Sunday of the Advent Season.
Defining moments: First time for making and tasting Yorkshire Pudding. Before this week I never even knew what Yorkshire Pudding was! I've heard the name here and there but I always imagined it to be, well, pudding. As in, Jell-O pudding. ;) This was also a memorable Sunday because I frosted a cake using lots of different techniques, piping tips, and frostings.
Recipe sources: The Mini Yorkshire Pudding recipe was created by Danny Boome, the host of Rescue Chef, and came from the Food Network website. I chose this recipe because I am cooking along with the members of the Food Network Chef Cooking Challenge that is being hosted by the writer of the I Blame My Mother blog. Learn more about this fun challenge by clicking here.
The Gold Cake recipe came from Betty Crocker's Picture Cook Book, copyright 1950. The recipe, which has been rephrased by me, follows:
Gold Cake
Yield: 2 9" layer pans or 13x9" oblong pan
Ingredients:
Instructions:
Preheat oven to 350F.
Grease and flour cake pans. Cream shortening, butter, and sugar together until fluffy. Blend in egg yolks. In another bowl, sift together flour, baking powder, and salt. In a measuring cup, combine milk, lemon extract, and vanilla. Add dry ingredients and milk mixture alternately to shortening mixture until cake batter is smooth. Pour into cake pans and bake for 25 to 30 minutes for layers OR 35 to 40 minutes for 13x9 pan. Test doneness of cake by inserting toothpick into center of cake; if it comes out clean the cake is done.
I used two kinds of frosting to make this cake. One is called Swiss Meringue Buttercream and the other is a traditional type of buttercream, made with butter, powdered sugar, and milk.
To me, and a good portion of my family, traditional buttercream is a bit too sweet and that is why I wanted to try out a new kind of frosting. The Swiss Meringue recipe was created by DyannBakes.com and I discovered it on YouTube. Visit this website to print out the recipe and view the embedded video. I made a modification to this recipe so please read on to learn more.
The traditional buttercream recipe was also discovered on YouTube and was created by DesignMeACake.com. Take a look at the recipe and video by clicking here. A quick note about this recipe: I noticed that the author of this recipe forget to mention the meringue powder in the written instructions. She does, however, mention it on the video. So for those who are interested in giving this one a go: add the meringue powder to the powdered sugar before mixing it with the butter and shortening.
What I learned: Let me first begin with the Yorkshire Pudding. When I first read through the recipe and looked at the comments it appeared to me that the recipe did not include all the hints and tips from the T.V. show. Too bad I didn't catch it on T.V.! Oh well. I still wanted to try them out so I decided to look around on some websites and blogs to see what other people are doing. I am so glad I did because I learned a lot of valuable information like using oil to grease the muffin pan instead of butter and using 3" wide muffin pans. I should always research the recipe before I try it out!
Now for dessert. Past couple of weeks I have been doing a lot of research on cake decorating and different types of frosting. Here are a couple tips I've accumulated:
A learned a lot more tips and I hope to type a separate post for this. Be expecting it soon! ;D
Any modifications? Yes. I made some to the Yorkshire Pudding and the Swiss Meringue.
For the Pudding--Instead of using butter to grease the muffin pans, I quickly sprayed the pans with cooking spray and filled each muffin hole with a 1/2 teaspoon of vegetable oil. And the puddings only took 25 minutes to bake.
For the Swiss Meringue--The recipe says to cook the egg whites and sugar until they reach the temperature of 140F. I learned from various sites that egg whites are not cooked until they reach 160F. Read this site to learn more. I want to play it safe, so 160 is my recommendation!
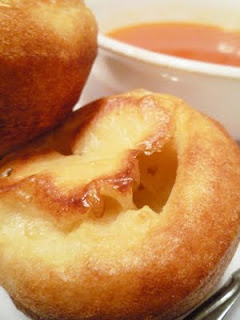
How it tasted? The "Yorkies" were light and had an almost creamy texture. They went very well with the homemade tomato soup, which by the way, my brother thought tasted better than when I first served it. Aw. The Yorkies had no trouble rising for me and I am still perplexed on how they actually rise when there is no leavening agent to be seen. I just started a Kitchen Chemistry class so maybe I'll be learning that bit of science in the near future.
The cake was liked by all, both in flavor and appearance! Yay! It is nice to have that happen after spending a lot of time studying cake decorating. I think it was a good move to use both the Swiss Meringue Buttercream and the traditional kind, because the latter tends to be overly sweet and can overpower the cake. My Papa says to make a chocolate Swiss Meringue next time--just what I was thinking. ;)
How about a 2nd time? Yes. Annemarie said we need to have the Yorkies with gravy, sounds like a plan to me.

Here are my Yorkshire Puddings and not a Jell-O box in sight!


A purple candle in honor of the First Sunday of Advent.

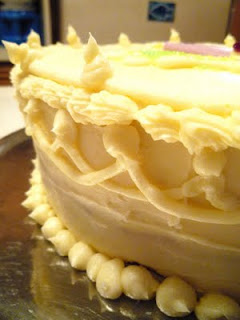
The frosting is ivory in color because I used colored vanilla extract. To achieve a white, white frosting, use clear extract of your choice.
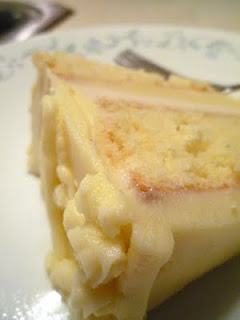
This cake has a lovely gold color because of the addition of egg yolks.

Watching hours of Ace of Cakes, Food Network Cake Challenges, and Cake Boss has finally paid off.
Meal details: For the main course I heated 1 1/2 quarts of homemade tomato soup from the freezer and baked some Yorkshire Pudding to eat alongside. For dessert, I made a Gold Cake, filled it with Swiss Meringue Buttercream and traditional buttercream, and frosted an Advent candle on top in honor of it being the First Sunday of the Advent Season.
Defining moments: First time for making and tasting Yorkshire Pudding. Before this week I never even knew what Yorkshire Pudding was! I've heard the name here and there but I always imagined it to be, well, pudding. As in, Jell-O pudding. ;) This was also a memorable Sunday because I frosted a cake using lots of different techniques, piping tips, and frostings.
Recipe sources: The Mini Yorkshire Pudding recipe was created by Danny Boome, the host of Rescue Chef, and came from the Food Network website. I chose this recipe because I am cooking along with the members of the Food Network Chef Cooking Challenge that is being hosted by the writer of the I Blame My Mother blog. Learn more about this fun challenge by clicking here.
The Gold Cake recipe came from Betty Crocker's Picture Cook Book, copyright 1950. The recipe, which has been rephrased by me, follows:
Gold Cake
Yield: 2 9" layer pans or 13x9" oblong pan
Ingredients:
- 1/4 cup soft shortening
- 1/4 butter
- 1 2/3 cups granulated sugar
- 5 egg yolks (3/8 cup), beaten until thick
- 2 1/2 cups sifted cake flour OR 2 1/3 cups sifted all-purpose flour
- 2 1/2 tsp. baking powder
- 1 tsp. salt
- 1 cup milk
- 1 tsp. lemon extract
- 1/2 tsp. vanilla
Instructions:
Preheat oven to 350F.
Grease and flour cake pans. Cream shortening, butter, and sugar together until fluffy. Blend in egg yolks. In another bowl, sift together flour, baking powder, and salt. In a measuring cup, combine milk, lemon extract, and vanilla. Add dry ingredients and milk mixture alternately to shortening mixture until cake batter is smooth. Pour into cake pans and bake for 25 to 30 minutes for layers OR 35 to 40 minutes for 13x9 pan. Test doneness of cake by inserting toothpick into center of cake; if it comes out clean the cake is done.
I used two kinds of frosting to make this cake. One is called Swiss Meringue Buttercream and the other is a traditional type of buttercream, made with butter, powdered sugar, and milk.
To me, and a good portion of my family, traditional buttercream is a bit too sweet and that is why I wanted to try out a new kind of frosting. The Swiss Meringue recipe was created by DyannBakes.com and I discovered it on YouTube. Visit this website to print out the recipe and view the embedded video. I made a modification to this recipe so please read on to learn more.
The traditional buttercream recipe was also discovered on YouTube and was created by DesignMeACake.com. Take a look at the recipe and video by clicking here. A quick note about this recipe: I noticed that the author of this recipe forget to mention the meringue powder in the written instructions. She does, however, mention it on the video. So for those who are interested in giving this one a go: add the meringue powder to the powdered sugar before mixing it with the butter and shortening.
What I learned: Let me first begin with the Yorkshire Pudding. When I first read through the recipe and looked at the comments it appeared to me that the recipe did not include all the hints and tips from the T.V. show. Too bad I didn't catch it on T.V.! Oh well. I still wanted to try them out so I decided to look around on some websites and blogs to see what other people are doing. I am so glad I did because I learned a lot of valuable information like using oil to grease the muffin pan instead of butter and using 3" wide muffin pans. I should always research the recipe before I try it out!
Now for dessert. Past couple of weeks I have been doing a lot of research on cake decorating and different types of frosting. Here are a couple tips I've accumulated:
- When piping with buttercream for a few minutes I noticed that it was getting runny and my piping was getting very sloppy. I learned that the frosting was melting because of the heat of my hands so I should place the bag in the refrigerator for a couple minutes. That is why it is so helpful to alternate between two piping bags, one can be kept in the fridge while the other is in use.
- When I am filling a pastry bag with frosting sometimes I wind up with frosting on the outside. To prevent this I should fold over the edge about two inches, pick up a bit of frosting on the end of my spatula, and insert the frosting as near to the piping tip as possible. And when I am piping, I should always give the bag a quick twist to stop the frosting from coming up to the top of the bag.
A learned a lot more tips and I hope to type a separate post for this. Be expecting it soon! ;D
Any modifications? Yes. I made some to the Yorkshire Pudding and the Swiss Meringue.
For the Pudding--Instead of using butter to grease the muffin pans, I quickly sprayed the pans with cooking spray and filled each muffin hole with a 1/2 teaspoon of vegetable oil. And the puddings only took 25 minutes to bake.
For the Swiss Meringue--The recipe says to cook the egg whites and sugar until they reach the temperature of 140F. I learned from various sites that egg whites are not cooked until they reach 160F. Read this site to learn more. I want to play it safe, so 160 is my recommendation!
How it tasted? The "Yorkies" were light and had an almost creamy texture. They went very well with the homemade tomato soup, which by the way, my brother thought tasted better than when I first served it. Aw. The Yorkies had no trouble rising for me and I am still perplexed on how they actually rise when there is no leavening agent to be seen. I just started a Kitchen Chemistry class so maybe I'll be learning that bit of science in the near future.
The cake was liked by all, both in flavor and appearance! Yay! It is nice to have that happen after spending a lot of time studying cake decorating. I think it was a good move to use both the Swiss Meringue Buttercream and the traditional kind, because the latter tends to be overly sweet and can overpower the cake. My Papa says to make a chocolate Swiss Meringue next time--just what I was thinking. ;)
How about a 2nd time? Yes. Annemarie said we need to have the Yorkies with gravy, sounds like a plan to me.

Here are my Yorkshire Puddings and not a Jell-O box in sight!


A purple candle in honor of the First Sunday of Advent.


The frosting is ivory in color because I used colored vanilla extract. To achieve a white, white frosting, use clear extract of your choice.

This cake has a lovely gold color because of the addition of egg yolks.

Watching hours of Ace of Cakes, Food Network Cake Challenges, and Cake Boss has finally paid off.
Food Network Challenge Times Two
11/22/09: Chorizo-and-Potato Taquitos and Millionaire Shortbread
Meal details: For the main course I made taquitos that were stuffed with chorizo sausage, potato, onions, peppers, and queso fresco cheese. For dessert we had shortbread squares that had layers of caramel and chocolate.
Defining moments: First time for me to make taquitos (only have heated frozen taquitos from the store up till now) and this is also the first time I used chorizo sausage and queso fresco cheese.
Recipe sources: I am part of the Food Network Chefs Cooking Challenge that is being hosted by the writer of the I Blame My Mother blog. (Learn more about this fun challenge by visiting this page.) Because I am two chefs behind I decided to do two recipes from the Food Network chefs to catch up with the rest of the members. The chefs ended up being Claire Robinson (from 5 Ingredient Fix) and Daisy Martinez (from Viva Daisy). I chose Claire's Millionaire Shortbread recipe and Daisy's Taquitos. The taquito recipe is not found on the Food Network website, I actually came across it in an issue of Everyday with Rachael Ray.
What I learned: Gee, making those taquitos was messy! I got frying oil everywhere, so much so, that we had to mop the whole floor. I think I could do a better, cleaner job if I just worked on the kitchen island instead of moving from counter to counter. I will not drip as much oil that way.
I made the taquitos the day before because I knew they would be tedious. After I was done frying I packed them in foil and moved them to the freezer.
I remembered from making chimichangas that tortillas rip and tear when being rolled up so before I began I tried to find some tips to prevent this problem. What I gathered from some sites and the actual recipe in the magazine, is to place them in the microwave or dip them in hot oil prior to the rolling up step. Since we don't have a microwave I went with the latter procedure. It worked fine--no broken tortillas when rolling--but it is because of this extra step that I made an oily mess on the floor. So I am still looking for another way to make these tortillas limber. Any suggestions? If so, please leave a comment!
Onto the Millionaire Shortbread. This recipe was VERY easy to do! The actual shortbread dough is just butter, sugar, salt, and flour that is mixed together with a pastry cutter (or food processor) and dumped into the baking pan. Nothing to it; I probably can do it in my sleep. The only temperamental part of this recipe is making the caramel, which is made of sweetened condensed milk and butter. It is cooked over a medium-high burner and you have to let it boil until it reaches the right color. I'm not really good with determining the "right" from the "wrong" so I just boiled it until it reached the consistency of pudding, which took exactly fifteen minutes. I read on the Food Network website that people were having trouble knowing when the caramel was done--and some even had it turn into a hard mass--so I knew I shouldn't boil it for more than the fifteen minutes that the recipes states. It worked out fine and it was easy to spread.
Any modifications? Yes, I made some to the taquito recipe. Here is my ingredient list for 4 times the recipe:
A quick note: I made one taquito with a flour tortilla and it fried up well and tasted great. I think I will make more when I try this again.
How it tasted? Everyone liked, well, everything. I was very happy to hear that! And what do I think of the two new ingredients? The chorizo sausage was spicy and reminded the family of tamales and the queso fresco cheese is really mild in flavor and it melts super fast. Both ingredients were delicious.
How about a 2nd time? Yes, for both recipes. And next time I will try to cut down on the mess!


Thanks Claire and Daisy for these great recipes!
Meal details: For the main course I made taquitos that were stuffed with chorizo sausage, potato, onions, peppers, and queso fresco cheese. For dessert we had shortbread squares that had layers of caramel and chocolate.
Defining moments: First time for me to make taquitos (only have heated frozen taquitos from the store up till now) and this is also the first time I used chorizo sausage and queso fresco cheese.
Recipe sources: I am part of the Food Network Chefs Cooking Challenge that is being hosted by the writer of the I Blame My Mother blog. (Learn more about this fun challenge by visiting this page.) Because I am two chefs behind I decided to do two recipes from the Food Network chefs to catch up with the rest of the members. The chefs ended up being Claire Robinson (from 5 Ingredient Fix) and Daisy Martinez (from Viva Daisy). I chose Claire's Millionaire Shortbread recipe and Daisy's Taquitos. The taquito recipe is not found on the Food Network website, I actually came across it in an issue of Everyday with Rachael Ray.
What I learned: Gee, making those taquitos was messy! I got frying oil everywhere, so much so, that we had to mop the whole floor. I think I could do a better, cleaner job if I just worked on the kitchen island instead of moving from counter to counter. I will not drip as much oil that way.
I made the taquitos the day before because I knew they would be tedious. After I was done frying I packed them in foil and moved them to the freezer.
I remembered from making chimichangas that tortillas rip and tear when being rolled up so before I began I tried to find some tips to prevent this problem. What I gathered from some sites and the actual recipe in the magazine, is to place them in the microwave or dip them in hot oil prior to the rolling up step. Since we don't have a microwave I went with the latter procedure. It worked fine--no broken tortillas when rolling--but it is because of this extra step that I made an oily mess on the floor. So I am still looking for another way to make these tortillas limber. Any suggestions? If so, please leave a comment!
Onto the Millionaire Shortbread. This recipe was VERY easy to do! The actual shortbread dough is just butter, sugar, salt, and flour that is mixed together with a pastry cutter (or food processor) and dumped into the baking pan. Nothing to it; I probably can do it in my sleep. The only temperamental part of this recipe is making the caramel, which is made of sweetened condensed milk and butter. It is cooked over a medium-high burner and you have to let it boil until it reaches the right color. I'm not really good with determining the "right" from the "wrong" so I just boiled it until it reached the consistency of pudding, which took exactly fifteen minutes. I read on the Food Network website that people were having trouble knowing when the caramel was done--and some even had it turn into a hard mass--so I knew I shouldn't boil it for more than the fifteen minutes that the recipes states. It worked out fine and it was easy to spread.
Any modifications? Yes, I made some to the taquito recipe. Here is my ingredient list for 4 times the recipe:
- 8 medium sized red skinned potatoes, peeled and quartered
- 6 tablespoons vegetable oil, plus more for frying
- 2 pounds Mexican chorizo, casings discarded
- 4 large onion, finely chopped
- One 6 oz. can of tomato paste
- 2 large ancho peppers, chopped
- Salt and pepper
- 12 oz. crumbled queso fresco
- Corn tortillas
A quick note: I made one taquito with a flour tortilla and it fried up well and tasted great. I think I will make more when I try this again.
How it tasted? Everyone liked, well, everything. I was very happy to hear that! And what do I think of the two new ingredients? The chorizo sausage was spicy and reminded the family of tamales and the queso fresco cheese is really mild in flavor and it melts super fast. Both ingredients were delicious.
How about a 2nd time? Yes, for both recipes. And next time I will try to cut down on the mess!


Thanks Claire and Daisy for these great recipes!
Not My Best Showing
11/15/09: Pizza and Apple Pie from Scratch
Meal details: For the main course I made three different types of pizzas: Broccoli and Parmesan, BBQ Chicken, and Traditional. For dessert I made two apple pies, one with Gravenstein apples and the other using apples picked from a wild apple tree growing on our farm.
Defining moments: This would be my first time making apple pie! Can you believe that one?
Recipe sources: I came up with the pizza toppings but I used a recipe created by Cat Cora for the dough. Check it out here. I chose this recipe because I am part of the Food Network Chefs Cooking Challenge that is being hosted by the writer of the I Blame My Mother blog. (Learn more about this fun challenge by visiting this page.)
For the pie now. I made the pie crust using the following recipe that came from The New Antoinette Pope School Cookbook, but I did shorten the instructions significantly.
DOUBLE PIE CRUST
2 ½ cups all-purpose flour -- sifted
3/4 teaspoon baking powder
1 1/2 teaspoons salt
1 cup shortening (we use butter flavored Crisco)
7 tablespoons cold milk (about)
Sift together dry ingredients and with pastry blender, cut in shortening until mixture looks like coarse meal. Add enough milk until dough appears moist but not wet. Try not to use more than 7 tablespoons unless necessary to hold dough together. Turn dough out and knead for a few seconds to hold mixture together. Handle as little as possible. Roll out using your favorite technique.
I didn't follow a recipe for the apple pie filling, I just did what Annemarie usually does. Which is...
Apple Pie Filling:
2 tablespoons flour
8 cups of apple slices *
1/2 cup sugar
3 tablespoons butter
Directions:
Place bottom crust in pan and dust with the flour. Add the apple slices and sprinkle sugar on top, no need to mix. Dot apples with butter. That's all there is to it! No cooking whatsoever.
* I used Gravenstein and a wild apple for my pies this time. For those who are interested in making their own, I suggest using the following varieties: Northern Spy, Idared, Jonathan, and Empire.
What I learned: It was difficult for me to make six, 10" sized pizzas using Cat Cora's pizza dough recipe. There just was not enough dough to work with, and because of this I had to break out a box of pizza dough mix. So if you are going to do this recipe, expect four, 10" sized pizzas or six, 6" sized pizzas. The dough is lovely to work with by the way!
I learned something invaluable this week and that is to bake my apple pies for a longer time! I've only done one type of fruit pie before and that was peach. With a peach pie it is easy to tell when it is done because you just wait until the peach juice bubbles. But this is not so with apple pie. So I was having a hard time deciding when to grab my potholders and I ended up under baking. Oops! :( Next time I will bake them at 350 degrees for 45 minutes and no less.
Any modifications? No, I followed the pizza dough recipe exactly.
How it tasted? The pizza dough was delicious and I liked how thin I rolled it out. Everyone liked the Broccoli and Parmesan pizza the most; the BBQ Chicken came in second.
The pies were just OK namely because of me under baking them. I was really disappointed by that! The wild apple didn't impart enough flavor; won't be using them again.
How about a 2nd time? I will be using the pizza dough recipe again but will double the recipe or just make one large one.
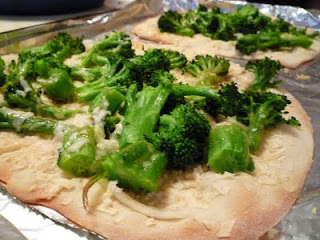
The Broccoli and Parmesan Pizza. I simply brushed the dough with olive oil, pre-baked it for two minutes, added the vegetables and cheese, then placed it back into the oven for 20 minutes at 375.
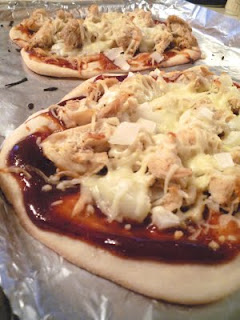
This is the BBQ Chicken version. I pre-baked the crust for two minutes, added the BBQ sauce, chicken, and mozzarella, then placed it back into the oven.
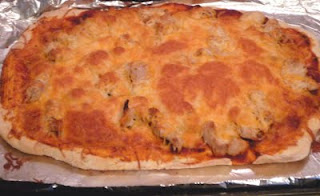
This is the Traditional Pizza. It is larger than the others and the dough was made using a boxed mix and some of Cat Cora's dough. The toppings are store bought pizza sauce, chicken, and a Monterey Jack/Colby cheese mix.
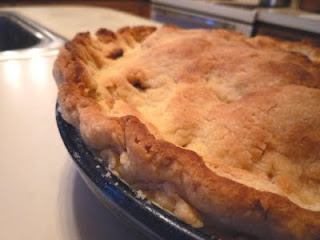
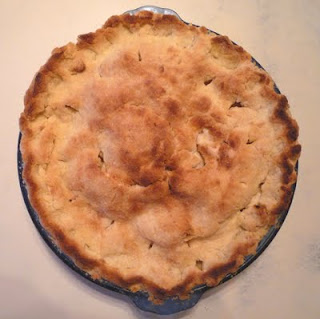
Mr. Apple Pie, I hope our next meeting shall be more pleasant.
A Modern Twist on Culinary School Staple
11/08/09: Coq Au Vin-guine
Meal Details: The famous French dish, Coq Au Vin, was made this week but it was done with a modern, Italian twist. This new recipe includes chicken breast, Italian red wine, mushrooms, onions, tomato paste, and pasta; hence the "guine" addition to the title.
Defining moments: First time for me to do a Coq Au Vin-like recipe. (By the way, Coq Au Vin translate as "cock with wine.")
Recipe sources: The recipe, that can be found here, was created by Brian Boitano (yes, the ice skater) for his show on Food Network called What Will Brian Boitano Make? I chose this recipe because I am part of the Food Network Chefs Cooking Challenge that is being hosted by the writer of the I Blame My Mother blog. (Learn more about this fun challenge by visiting this page.) I had a rather difficult time deciding to make this dish or not. It included a lot of ingredients and from what I got from the directions, it sounded like it had a lot of steps. I've never seen Brain's show yet so I didn't know at the time if his recipes are that easy to do. But I forgot that I am part of a cooking challenge, and so I took a deep breath and went with it. :)
What I learned: Yes, the recipe directions sounded intense but I learned that this recipe isn't all that hard. The first time around may be a little hectic at times so give yourself extra time; just don't worry, the second attempt will be a whole lot easier. I did not, however, like cubing the chicken breast before it was cooked. I just don't like working with squishy, drippy, raw meat. Ah, another challenge to overcome. :) To help with the cleanup (probably the worst part of dealing with chicken), I cut the chicken on two layers of wax paper that I taped to the counter using masking tape. I use this wax paper/masking tape method a lot when I am kneading dough. So when you are done cutting or kneading, just remove tape and throw away the paper. Fast cleanup!
Any modifications? Yes, I made a lot of ingredient substitutes and amount changes. Here is the ingredient list for two times the recipe with my notes:
How about a 2nd time? Yes, without a doubt.


A couple hours before I tied on my apron, me and my siblings went for a walk around the lakes. Here are some shots.


Had to do the traditional "V" of course! ;)
Meal Details: The famous French dish, Coq Au Vin, was made this week but it was done with a modern, Italian twist. This new recipe includes chicken breast, Italian red wine, mushrooms, onions, tomato paste, and pasta; hence the "guine" addition to the title.
Defining moments: First time for me to do a Coq Au Vin-like recipe. (By the way, Coq Au Vin translate as "cock with wine.")
Recipe sources: The recipe, that can be found here, was created by Brian Boitano (yes, the ice skater) for his show on Food Network called What Will Brian Boitano Make? I chose this recipe because I am part of the Food Network Chefs Cooking Challenge that is being hosted by the writer of the I Blame My Mother blog. (Learn more about this fun challenge by visiting this page.) I had a rather difficult time deciding to make this dish or not. It included a lot of ingredients and from what I got from the directions, it sounded like it had a lot of steps. I've never seen Brain's show yet so I didn't know at the time if his recipes are that easy to do. But I forgot that I am part of a cooking challenge, and so I took a deep breath and went with it. :)
What I learned: Yes, the recipe directions sounded intense but I learned that this recipe isn't all that hard. The first time around may be a little hectic at times so give yourself extra time; just don't worry, the second attempt will be a whole lot easier. I did not, however, like cubing the chicken breast before it was cooked. I just don't like working with squishy, drippy, raw meat. Ah, another challenge to overcome. :) To help with the cleanup (probably the worst part of dealing with chicken), I cut the chicken on two layers of wax paper that I taped to the counter using masking tape. I use this wax paper/masking tape method a lot when I am kneading dough. So when you are done cutting or kneading, just remove tape and throw away the paper. Fast cleanup!
Any modifications? Yes, I made a lot of ingredient substitutes and amount changes. Here is the ingredient list for two times the recipe with my notes:
- 1 cup olive oil, divided
- 1/4 pound pancetta, chopped (I used two tablespoons of leftover bacon grease we have. Brian really only wanted the bacon fat to saute the veggies in.)
- 2 pound cipollini onions, peeled and sliced in 1/2 (I just used three medium sized Sweet Spanish onions that we grow on the farm.)
- 1 cup all-purpose flour
- Salt and freshly ground black pepper
- 2 1/2 pounds boneless skinless chicken breast, cut into bite-size pieces
- 2 pounds crimini mushrooms, sliced (I used 24 oz. of fresh button mushrooms)
- 4 cloves garlic, chopped
- 4 tablespoons tomato paste (I used 6 oz. of tomato paste.)
- 2 bottles medium-bodied Italian red wine
- 6 sprigs fresh thyme, leaves removed
- 2 tablespoon unsalted butter
- 2 pound linguine (I used egg noodless)
- Fresh parsley leaves, roughly chopped (Didn't use this herb, I garnished it with the thyme instead.)
How about a 2nd time? Yes, without a doubt.


A couple hours before I tied on my apron, me and my siblings went for a walk around the lakes. Here are some shots.


Had to do the traditional "V" of course! ;)
The Root of the Matter--Discovering the History of Alfredo Sauce and Learning the Flavor of Parsnips
11/01/09: Fettuccine Alfredo with Garlic Bread and Pan Fried Parsnips
Meal details: For the main dish I made Fettuccine Alfredo, a simple pasta dish that has only three ingredients--pasta, Parmesan cheese, and butter. For a side dish I pan fried some parsnips. And I baked a loaf of store-bought garlic bread.
Defining moments: First time making an Alfredo sauce from scratch, I've only done a similar sauce from a Hamburger Helper box!
Recipe sources: The pasta dish came from this site. The parsnips were prepared in a similar way that was dictated by a customer who stopped at my family's fruit and vegetable market. Here is a short recipe for the parsnips:
Pan Fried Parsnips in Butter
Yield: 2 servings
Ingredients:
Place parsnips in a pot on a medium-high burner. Add water and cover. Let parsnips cook until they are fork tender. Add butter and salt and fry parsnips for 8 minutes with the lid off.
I decided not to do a dish for the Food Network Chefs Cooking Challenge that is being hosted by the I Blame My Mother blog. (Read more about it here.) It is because I wanted to make something really easy and not spend a whole lot of time in the kitchen this week. But do not fear! I have already selected next week's recipe from Brian Boitano, so be expecting that soon.
What I learned: I learned a lot about Alfredo sauce this week, a lot of things I didn't expect. When I was searching for a recipe for this type of sauce I find all sorts of different versions. Some included cream, others cream cheese. I then discovered that these recipes are far from being authentic Alfredo sauce, for the true sauce has only three ingredients: pasta, Parmesan cheese, and butter.
So where does this recipe come from and what does "Alfredo" translate as?
Alfredo is actually a name of a chef (Alfredo di Lelio is his full name) who lived in this past century. He owned a restaurant in Rome called Pasta Alfredo and his recipe, Fettuccine Al'Burro (which means Fettuccine with double butter), was born there. He didn't make it for his restaurant, though, actually he came up with the simple pasta dish for his wife. She had a lost of appetite during her pregnancy so he wanted to make a healthy, nutritious dish for her and win back her appetite.
The pasta dish gained real popularity when movie stars--such as Elizabeth Taylor, Tyrone Powers, and Ava Gardner--stopped by his restaurant and were photographed eating their fettuccine with Pasta Alfredo's famous golden forks.
OK, enough with the history lesson. Did I learn anything about the parsnips? Yes, I learned that they are strong in flavor and taste like a carrot with a bit of celery. My parsnips weren't as tender as I wanted them to be. I think they would have been softer if I allowed them to cook longer in the pot with the lid on to sort of braise them. I really need to test them with a fork.
Any modifications? Yes, I made some ingredient adjustments to the Alfredo recipe. The recipe from the website has a 1:1 ratio for the cheese and butter. I made a little batch of sauce following this ratio and I thought it was way too buttery! I couldn't really taste the cheese. So my amounts were: 3 cups Parmesan, and 1 1/2 cups butter. And that was enough sauce to coat 2 pounds of pasta. These new amounts worked perfectly together.
How it tasted? It was a simple pasta dish but very satisfying. It is very easy to make, too, as you can well imagine! The parsnips were good, but I would have enjoyed them more if they were more tender. And I thought they needed a bit of pepper. I think roasting them will be a very good method to try.
How about a 2nd time? For the Alfredo sauce, yes. For the parsnips, yes, but only if I make the alterations that I stated above.


Meal details: For the main dish I made Fettuccine Alfredo, a simple pasta dish that has only three ingredients--pasta, Parmesan cheese, and butter. For a side dish I pan fried some parsnips. And I baked a loaf of store-bought garlic bread.
Defining moments: First time making an Alfredo sauce from scratch, I've only done a similar sauce from a Hamburger Helper box!
Recipe sources: The pasta dish came from this site. The parsnips were prepared in a similar way that was dictated by a customer who stopped at my family's fruit and vegetable market. Here is a short recipe for the parsnips:
Pan Fried Parsnips in Butter
Yield: 2 servings
Ingredients:
- 2 medium parsnips, peeled and sliced into 1/4" thick coins
- 4 tablespoons water
- 1 tablespoon salt
- 2 tablespoons butter
Place parsnips in a pot on a medium-high burner. Add water and cover. Let parsnips cook until they are fork tender. Add butter and salt and fry parsnips for 8 minutes with the lid off.
I decided not to do a dish for the Food Network Chefs Cooking Challenge that is being hosted by the I Blame My Mother blog. (Read more about it here.) It is because I wanted to make something really easy and not spend a whole lot of time in the kitchen this week. But do not fear! I have already selected next week's recipe from Brian Boitano, so be expecting that soon.
What I learned: I learned a lot about Alfredo sauce this week, a lot of things I didn't expect. When I was searching for a recipe for this type of sauce I find all sorts of different versions. Some included cream, others cream cheese. I then discovered that these recipes are far from being authentic Alfredo sauce, for the true sauce has only three ingredients: pasta, Parmesan cheese, and butter.
So where does this recipe come from and what does "Alfredo" translate as?
Alfredo is actually a name of a chef (Alfredo di Lelio is his full name) who lived in this past century. He owned a restaurant in Rome called Pasta Alfredo and his recipe, Fettuccine Al'Burro (which means Fettuccine with double butter), was born there. He didn't make it for his restaurant, though, actually he came up with the simple pasta dish for his wife. She had a lost of appetite during her pregnancy so he wanted to make a healthy, nutritious dish for her and win back her appetite.
The pasta dish gained real popularity when movie stars--such as Elizabeth Taylor, Tyrone Powers, and Ava Gardner--stopped by his restaurant and were photographed eating their fettuccine with Pasta Alfredo's famous golden forks.
OK, enough with the history lesson. Did I learn anything about the parsnips? Yes, I learned that they are strong in flavor and taste like a carrot with a bit of celery. My parsnips weren't as tender as I wanted them to be. I think they would have been softer if I allowed them to cook longer in the pot with the lid on to sort of braise them. I really need to test them with a fork.
Any modifications? Yes, I made some ingredient adjustments to the Alfredo recipe. The recipe from the website has a 1:1 ratio for the cheese and butter. I made a little batch of sauce following this ratio and I thought it was way too buttery! I couldn't really taste the cheese. So my amounts were: 3 cups Parmesan, and 1 1/2 cups butter. And that was enough sauce to coat 2 pounds of pasta. These new amounts worked perfectly together.
How it tasted? It was a simple pasta dish but very satisfying. It is very easy to make, too, as you can well imagine! The parsnips were good, but I would have enjoyed them more if they were more tender. And I thought they needed a bit of pepper. I think roasting them will be a very good method to try.
How about a 2nd time? For the Alfredo sauce, yes. For the parsnips, yes, but only if I make the alterations that I stated above.
The photos of my dishes were accidentally deleted from the camera so they didn't make it to the blog this time. :( But do not fret you photo addicts, here are two shots of the parsnips my family freshly dug from our parsnip patch:


Subscribe to:
Posts (Atom)


