Tried and True Recipe: Pizza Buns


Back again this weekend to share with you yet another pizza recipe!
TNT Recipe: Chicago Style Pizza
TNT Recipe: Favorite Brownies
TNT Recipe: Blueberry Pancakes
Tried and True Recipes Intro
This recipe, simply put, is a pizza done cinnamon roll/jelly roll style. Don't worry, it's not one of those fiddly yeast dough recipes that require great skill in dough manipulation. May not be as easy to make as the Chicago Style pizza from last week, but it is, in my opinion, easier to make (and bake), than the traditional flat, circular pizza pie. I have found through my experiences that it is not always easy to roll and stretch out pizza dough to a large and thin circular object. Main cause of this is not giving the dough enough time to rest and have the gluten relax--and time is not something I always have. So with these pizza rolls, the dough needs just a short spurt of rising (for me, 50 minutes on average in a warm kitchen), before rolling it out into a shape that resembles a rectangle. It needn't be exact, because jelly rolls through their nature, always turn out beautifully, even if they start with rather poor aesthetics.
So after rolling out the dough to a rectangular shape, you spread out your filling. In my case I used ground Italian pork sausage that was browned and cooled beforehand. Follow this with a few handfuls of mozzarella, and we're good. Taking a long side, roll the dough into a log just as you would your traditional jelly roll. Seal the edges with a bit of water; it is not a sticky dough in the first place and it needs some help in the adhesive department. Using a knife, cut twelve rolls from each log.
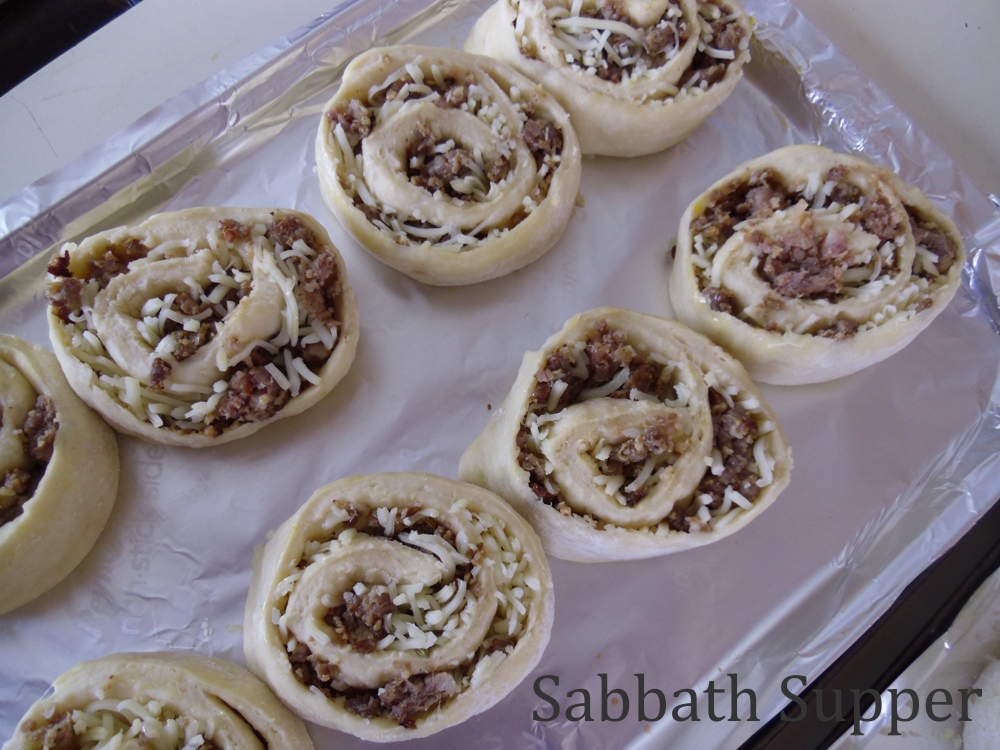 |
| [ rolls with sausage and cheese filling rising for the 2nd time ] |
 |
| [ I chose to do six of them with only cheese ] |
After another short rise (twenty minutes or so), and fifteen minutes of baking in a 350F oven, take out the rolls and give them a good dollop of homemade pizza sauce. I would say two large dollops per roll. I think "dollop" terms do help. Should be placed right alongside "pinch."


And of course more cheese! Place rolls back in the oven and bake for fifteen minutes more. Before you take them out you may want to do what I do to get a nice golden brown cheese topping. (I love crispy cheese!) I like to turn on the broiler and broil until I see the right amount of golden brown. Takes only but a few minutes more and I think it is well worth the extra time. If you try to achieve golden brown cheese delight by way of extended baking at 350F, your pizza bun bottoms will be past satisfactory by the time the cheese catches up. Believe me, I've been there.
So without further ado. . .


Pizza Buns
Recipe comes from the King Arthur Flour website. See it here.
(Click here for printable recipe)
Buns
- 1/2 cup milk
- 2/3 cup hot tap water
- 3 tablespoons olive oil
- 1 1/4 teaspoons salt
- 4 teaspoons Pizza Dough Flavor,* optional but good
- 1 tablespoon sugar
- 3 tablespoons Baker's Special Dry Milk or nonfat dry milk
- 2 tablespoons potato flour or 1/4 cup instant potato flakes
- 3 1/2 cups King Arthur Unbleached All-Purpose Flour
- 2 teaspoons instant yeast
- *Increase the salt to 1 1/2 teaspoons if you omit the Pizza Dough Flavor
Filling
- 1 1/2 lb. Italian sausage, removed from casing, crumbled, and fried
- 1 cup shredded mozzarella or Monterey Jack cheese, or the pizza cheese of your choice
Topping
- 1 cup pizza sauce
- 1/2 teaspoon Pizza Seasoning, optional
- 2 teaspoons sugar, optional
- 3 cups shredded mozzarella or Monterey Jack cheese, or the pizza cheese of your choice
Directions
1) Whisk together the milk, hot water, and olive oil. The hot water should heat the milk so that the entire mixture is lukewarm. Set it aside.
|
2) In a separate, larger bowl, whisk together the salt, Pizza Dough Flavor, sugar, dry milk, potato flour, all-purpose flour, and yeast.
|
3) Add the wet ingredients to the dry ingredients, stirring to combine.
|
4) Mix and knead the mixture — by hand, using a stand mixer, or in a bread machine — to make a smooth, soft dough.
|
5) Place the dough in a lightly greased bowl or a large (8-cup) measuring cup, cover it, and allow it to rise till doubled, 60 to 90 minutes.
|
6) Gently deflate the dough, and transfer it to a lightly greased work surface.
|
7) Roll the dough into a 12" x 18" rectangle.
|
8) Spread evenly with the 1 cup cheese, and the browned sausage, gently pressing them into the dough.
|
9) Starting with a short end, roll the dough into a log. Cut the log into 12 pieces.
|
10) Space the rounds on two parchment-lined or lightly greased baking sheets, six to a sheet. Flatten each to about 1/2" thick.
|
11) Cover the pan, and allow the buns to rise for 60 to 90 minutes, till they're nicely puffed. Towards the end of the rising time, preheat the oven to 350°F.
|
12) Bake the buns for 15 minutes. While the buns are baking, combine the tomato sauce with the Pizza Seasoning and 2 teaspoons sugar, if you're using them.
|
13) Remove the buns from the oven, and brush each with a generous tablespoon of sauce. Sprinkle with about 1/4 cup shredded cheese.
|
14) Return the buns to the oven, and bake until their edges are golden brown, and the cheese is melted, about 15 to 20 minutes.
|
15) Remove from the oven, and serve warm. Store any leftovers in the refrigerator. Reheat for about 10 minutes, covered, in a 350°F oven; or very briefly in a microwave.
|
Yield: 12 pizza buns.
|
---------------------------------
Come back on April 7th for another tried and true recipe!
Tried and True Recipe: Chicago-Style Pizza
My family loves pizza. I've tried many different variations throughout the years, from BBQ Chicken Pizza to Ciabatta Bread Pizza. We like any version really but one does stand out in regards to being flavor-packed and easy to make. You may remember me mentioning it last year; it is the Chicago-Style Garlic and Butter Pizza. Made it so often that it has become the Tried and True Recipe of the Pizza World; for this house anyway!
Tried and True Recipes (TNT) are those great, no-fail recipes you reach for again and again. I am doing a TNT series here on this blog where I will post one of my family's TNT recipes every other Sunday. See my previous posts:
So this is what the pizza looks like:
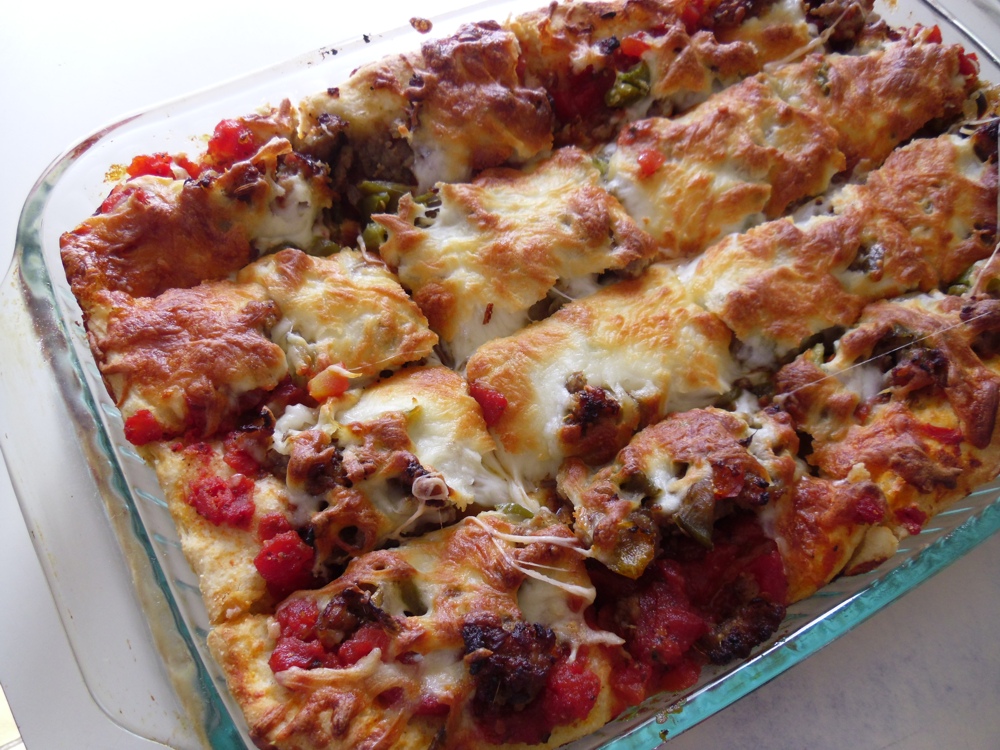


13x9 pan! Yay! Makes it so much easier to do. If you have a Pyrex dish of some sort you might want to make the pizza in that. It allows you to take a peek of the bottom while cooking to make sure it is not too under or over browned.
So here is the recipe and a side note to go with it. It is not necessary to use garlic and butter in the crust. The garlic can be completely omitted (which I did once and it still was tasty), and vegetable or olive oil can be substituted for the butter.
Update: I modified the following recipe on 4/14/13 to make it closer to what I personally do.
Chicago-Style Garlic and Butter Pizza Crust
Yield: One 13x9 pan / Click here for printable recipe
- 1 (2-1/4 tsp.) package active dry yeast
- 1-1/4 cups lukewarm water (110F - 115F)
- 3-1/4 cups flour, plus more for dusting (Try using half bread flour; makes for a chewy crust)
- 1 tsp. sugar
- 1/2 cup cornmeal
- 1 tsp. salt
- 4 tbsp. butter
- 4 garlic cloves, minced
- pizza toppings, your choice (What I Did: My toppings were homemade pizza sauce--tomato sauce, dried basil, salt and pepper, sugar--mozzarella cheese, sliced bell peppers lightly sauteed, and browned, Italian pork sausage)
Directions:
1. In a measuring cup, dissolve yeast with 1-1/4 cups lukewarm water and sugar. Wait until yeast starts to "bloom" or create foam.
2. In a small saucepan, melt butter. Add garlic to butter and cook on medium heat until fragrant. Move from heat.
3. In a large bowl, combine flour, cornmeal, and salt. Stir in yeast mixture. Add butter and garlic mixture.
4. Turn out onto a lightly floured work surface and knead until soft and elastic, about 5 minutes. Lightly grease a large bowl, add the dough and turn to coat. Cover and let rise until doubled in size, about 1 hour.
4. Deflate dough. Grease a 13x9" baking dish and press in dough to cover bottom and 2 inches up the sides; let rise for 20 minutes. While waiting for dough to rise, preheat over to 400F.
5. Top pizza dough with your favorite toppings and bake for 30 minutes.
Tried and True Recipe: Favorite Brownies
Whenever a recipe allows me to spend fifteen minutes prepping, thirty minutes baking, zero to three minutes cooling, and all done with a 13x9 pan, well, let's just say that the recipe print out or cookbook page quickly becomes crumbled and stained by multiple use. I love this type of recipe because advance planning is not necessary and I wind up with a dessert in under an hour. Oh, and don't forget that 13x9 pan tagline. I don't know why but whenever I see the 13x9 pan as recommended hardware in the recipe, everything seems so much more doable.
Now onto my promised Tried and True Recipe for today. Tried and True Recipes (TNT) are those great, no-fail recipes you reach for again and again. I am doing a TNT series here on this blog where I will post one of my family's TNT recipes every other Sunday. See my previous posts:
Actually, this time I will be sharing two recipes, each being a recipe for a brownie. And yes, they come together in no time and 13x9 pans are in your future.
The recipes are called "Best Butterscotch Brownies" and "Four-Way Fudge Brownies." Sounds yummy, huh? So you can better picture them in your mind. . .


I could take credit for these moist, chewy, fudgy, butterscotch-y brownies, but I shouldn't. My sister Catherine baked these and did a mighty fine job. They tasted better than usual!
What I really like about these butterscotch brownies is that no butterscotch chips are used. Brown sugar and butter heated together is what gives them their flavor. To me, butterscotch in chip form leaves a metallic aftertaste so not too fond of them. Another highlight for these brownies is how well they travel. Great lunchbox choice.
I tried a lot of different chocolate brownies before I found the Four-Way Fudge Brownies recipe. With a lot of the recipes I found the chocolate to be prominent, but the brownie's chewiness was always an issue. They always turned out more crisp than I wanted them to be. Up until last year when I found the Four-Way Fudge Brownies, I thought boxed brownies were the best. Yeah, I was that far from brownie bliss.
Onto the recipes!
Best Butterscotch Brownies
(click here for printable version)
source: www.cdkitchen.com
Ingredients:
2 cups light brown sugar
1-1/2 sticks butter, melted
2 eggs
2 cups flour
2 tsp. baking powder
1 tsp. salt
1 tsp. vanilla
Directions:
Melt sugar and butter together. Cool. Add eggs. Mix flour, baking powder, salt, and vanilla together. Add to other mixture. Mix well. Bake in greased 13x9 pan at 350F for 30 minutes.
------------------
Four-Way Fudge Brownies
(click here for printable version)
source: Better Homes and Garden cookbook, out of print
Ingredients:
1 cup butter
4 ounces unsweetened chocolate, cut up
2 cups sugar
4 eggs
2 tsp. vanilla
1-1/3 cups flour
Directions:
Grease a 13x9 pan and set aside. In a medium saucepan, melt butter and chocolate over low heat. Remove from heat. Stir in sugar, eggs, and vanilla. Beat lightly by hand just until combined. Stir in flour.
Spread batter into prepared pan. Bake brownies in a 350F oven for 30 minutes.
------------------
Next TNT recipe will be posted on March 10!
Tried and True Recipe: Blueberry Pancakes
Here's the premiere post of my brand new blog series: Tried and True Recipes. TNT recipes are those great, no-fail recipes that you reach for again and again. See my previous post to learn more.
Homemade blueberry pancakes have been a staple for my family for years. They are the pinnacle of Sunday brunches and most recently, Friday lunches, as we abstain from meat on this day of the week. Add the fact that we grow and freeze our own blueberries and you have one spectacular pancake. We typically reach for the Bisquick mix to make pancakes, but last year I found a wonderful pancake recipe from Annemarie's famous Betty Crocker cook book from 1950. According to Pinterest, this is one popular cook book! Recipe follows photos. . .


Blueberry Pancakes
(click here for printable recipe)
Ingredients:
1 egg
1-1/4 cups buttermilk
1/2 tsp. baking soda
1-1/4 cups all-purpose flour
1 tsp. sugar
2 tbsp. soft butter
1 tsp. baking powder
1/2 tsp. salt
1/4 to 1/3 cup frozen blueberries
Directions:
In a bowl, combine eggs, milk, and baking soda. Beat until foamy. Beat in flour, sugar, butter, baking powder, and salt. Make sure you don't over beat. Pour frozen blueberries in (don't bother rinsing them unless you see ice), and stir gently with a spoon.
Heat griddle and grease with butter. Here's a tip on how to grease: take a stick of butter straight from the fridge and unwrap it at one end. Using the other end as a handle, slide the butter stick over the entire surface of the griddle. Place butter back in fridge until you have to grease again. Using a ladle, pour batter on hot griddle. Test and adjust amount of batter you need for a pancake in your preferred diameter. (Hey, every family is different. Some like it big, others small!) Once the pancakes' edges are firm and you see large bubbles in the middle, it is time to flip. First, use a large spatula to cut and separate the pancakes that are touching, then flip!
As soon as the other side is brown the pancakes are ready to eat. You can have them right off the griddle or you can place them in a warm, glass baking dish and put them in a warm oven. They will be still nice and butter-melting-warm when it's time to eat!
Yield: 16 4" pancakes.
------
Next TNT recipe will be posted on February 24!
New Tried and True Series

I've been mulling over in my mind an idea I came up with a couple weeks ago. In a nutshell, it is a series of blog posts where each post will have the slogan: "Tried and True Recipe." Or "TNT" for short. So what makes a tried and true recipe? For me, a TNT recipe is one that I grab for first whenever I think of making that particular dish. I remember watching Melissa D'Arabian (host of Ten Dollar Dinners on Food Network), a couple years ago and she used to say, "This is a good recipe to have in your back pocket." In other words, a great, no-fail recipe that has proved his worth in the past and acts like a culinary swiss army knife. Aka family favorites. Aka comfort food. Aka tried and true recipe. Aka TNT recipe.
Years ago when Sabbath Supper was just starting out, I used to post each week what I cooked/baked on Sunday afternoon. That's where the name came from! For this new series, I will be scheduling a post every other Sunday morning with a TNT recipe to share with you. So you can sip your coffee and read at the same time. :) A written (and printable) recipe will be shared along with any tips that will help make my recipe a TNT recipe for you.
The first post in this series will be going public this coming Sunday, February 10th.
----------
Some other news: I thought I should fill you in on some recent news of mine. First I will give you some background info! Last summer I started to sell homemade baked goods at Magicland Farms (my family's roadside farm market), under the Michigan Cottage Food Law. I was selling bar cookies, brownies, blueberry muffins, sugar cookies, cupcakes, and more throughout the summer and fall months. All of them were really popular and I had a hard time keeping up with the demand! Thank goodness we had air conditioning because I don't think I could have made it through hot summer baking without it!
Later in the year I started selling my baked goods at craft shows and forming my own business called Becky's Sweet Delights Bakery. (See website here.)
Last month I managed to obtain a job at a local camp and will be working part time as Food Service Staff. In all likelihood, I will need to cut off any bakery pursuits for this year which is a sad thing considering how new it is. On the bright side, it will always be there for me to lean back on and it is something I know I will enjoy. I am very excited to start working at the camp; my training will be starting at the end of February so I don't have to wait very long at all! Pray for me and my new endeavor!
How to Freeze Broccoli - The Long Awaited Video

Hi there! No news from me since July. Gosh! Sabbath Supper just kept on being pushed down to the end of my to-do lists. Maybe there will be a change soon with my posting schedule. I do hope so!
In October (yeah, way back then), I had the chance to freeze some of our broccoli and thought it may be a good topic to do a how-to video on. Broccoli is not the easiest vegetable to do namely because of three things: how to remove the bugs, if any, how to cut the broccoli so everything cooks at the same rate, and lastly, the blanch timing. I covered all of those questions in the video and I do hope you enjoy it! See the video here.
Have an upcoming post in the works that has something to do with a local bakery. Will share the details soon.
A Cooking Video by Yours Truly

OK, I may not be really "cooking" in the video I just put together last Sunday, but it does include ingredient preparation. It is called "How to Pick and Prepare Garlic Scapes." I start out in the garlic patch out on our farm showing you how to pick the scape from the garlic plant. I then go to the kitchen and show you the way I chop them--may seem like a no-brainer but, really, scapes can be cumbersome to cut!
I started making videos and uploading them to YouTube last February. Until the creation of the garlic scape, I was only constructing craft-related videos, such as How to Find Both Ends to Skein of Yarn and How to Find the Straight of Grain. I love my how-to videos! I've been playing with the idea of a video that was in the world of cooking for, um. . .Since I heard of YouTube. So 2006? Took me a long time to make it a reality, don't you think? I suppose I needed to practice with this video making stuff before I took the plunge. Anyway, I'm glad I did and I have a lot of other ideas for cooking videos. I'll probably save all of this for Fall when I have the time (farm work, you know), so be expecting some updates in September.
In the meantime, give me so more ideas by leaving a comment below. I would love to see what you have to say!
P.S. If your cable or satellite package includes Cooking Channel, you're most likely familiar with their little blurbs they do often. Like: "This is Cooking Channel. . . Stay hungry." Familiar? Well, if you pay close attention to one, the sliding background depicts the ever-so-unlikely garlic scape. :) Could not believe it.
CHOW's Bread and Butter Radishes
If you ever had to cook for a large amount of people, work for a restaurant, or work at a grocery store or farm market, you're probably well acquainted with leftovers. Produce or product that just wasn't consumed or bought.
So last Saturday at the family farm market, we had bags of radishes leftover. And since we're closed Sundays, these radishes would not find another home.
My family doesn't normally eat radishes in quantity and so I wasn't sure what to do with all this surplus product over the weekend. They looked so cheery and fresh and, well, just had to be used someway, somehow!
Then it happened. How about pickling them? Hmm. I love pickled vegetables: beets, relish, corn, etc. Not too sure how I arrived at this idea; must be something to do with my fixation of Chopped or something. They pickle everything on there, even kohlrabi.
Found a tantalizing recipe soon enough on Chow.com. Don't go there often. . . But after great success with a pancake question on their forums, will be stopping by again.
So here's the recipe:
INGREDIENTS
1 bunch red radishes (about 13 radishes)
1/2 cup red wine vinegar
1/4 cup granulated sugar
1/4 cup water
2 teaspoons kosher salt
1/2 teaspoon yellow or brown mustard seed
1/4 teaspoon whole coriander seed
1/4 teaspoon whole black peppercorns
1 medium dried bay leaf
INSTRUCTIONS
Rinse radishes and trim off their leafy tops. Holding the stem end, thinly slice radishes with a mandoline or a sharp knife. When you get close to the stem, stop slicing and discard the end. Place radishes in a heatproof, nonreactive bowl, and set in the refrigerator while making the brine.
Combine red wine vinegar, sugar, water, salt, mustard seed, coriander seed, peppercorns, and bay leaf in a small saucepan and bring to a simmer over medium-high heat. Stir occasionally until sugar is dissolved.
Remove from heat and let pickling brine cool for about 5 minutes. Remove radishes from the refrigerator and pour brine over them. Let cool at room temperature for 20 minutes; cover and refrigerate. Use to top burgers, sandwiches, or anything else that needs a little tarting up.


So last Saturday at the family farm market, we had bags of radishes leftover. And since we're closed Sundays, these radishes would not find another home.
My family doesn't normally eat radishes in quantity and so I wasn't sure what to do with all this surplus product over the weekend. They looked so cheery and fresh and, well, just had to be used someway, somehow!
Then it happened. How about pickling them? Hmm. I love pickled vegetables: beets, relish, corn, etc. Not too sure how I arrived at this idea; must be something to do with my fixation of Chopped or something. They pickle everything on there, even kohlrabi.
Found a tantalizing recipe soon enough on Chow.com. Don't go there often. . . But after great success with a pancake question on their forums, will be stopping by again.
So here's the recipe:
INGREDIENTS
1 bunch red radishes (about 13 radishes)
1/2 cup red wine vinegar
1/4 cup granulated sugar
1/4 cup water
2 teaspoons kosher salt
1/2 teaspoon yellow or brown mustard seed
1/4 teaspoon whole coriander seed
1/4 teaspoon whole black peppercorns
1 medium dried bay leaf
INSTRUCTIONS
Rinse radishes and trim off their leafy tops. Holding the stem end, thinly slice radishes with a mandoline or a sharp knife. When you get close to the stem, stop slicing and discard the end. Place radishes in a heatproof, nonreactive bowl, and set in the refrigerator while making the brine.
Combine red wine vinegar, sugar, water, salt, mustard seed, coriander seed, peppercorns, and bay leaf in a small saucepan and bring to a simmer over medium-high heat. Stir occasionally until sugar is dissolved.
Remove from heat and let pickling brine cool for about 5 minutes. Remove radishes from the refrigerator and pour brine over them. Let cool at room temperature for 20 minutes; cover and refrigerate. Use to top burgers, sandwiches, or anything else that needs a little tarting up.
------
Modifications: Made a few modifications out of necessity. Didn't have coriander or black peppercorns on hand but I did have pickling spice which is comprised of these two spices and more. So I added that to the vinegar solution using a two-layer cheesecloth sack tied with butcher's twine. I don't know why but I feel very French when I break out the cheesecloth.
I also didn't have dry bay leaves only a bay leaf tree. Yeah, not your typical house plant! I decided against plucking the fresh leaves because I knew the fresh ones are less potent, and these pickled radishes were going to be devoured in a matter of three hours. Just not enough time to impart their flavor.
How Did We Like It? The family and I thought they were really, really good. The radishes were crisp and the "juice" was sweet, tart, and perfectly spiced. Will do again. We have another patch of radishes coming along which is good to know!
Here is how they turned out:


P.S. Yes, I know very well that my blogging has been few and far between. My mindset these past months have been more of "get the job done" than "let's stop and take a few pictures!" Having to make a homecooked meal almost everyday of the week (sometimes two meals), zaps the whimsy, fun, and creativity out of a person. It becomes more of a day-to-day chore. That is why I was so happy to flip through some new cooking magazines Annemarie lent me yesterday. They gave me some great inspiration and made me motivated to really give these bread and butter radishes a try. This week I'm going to go recipe exploring and try out two new ones. Maybe even try pickled kohlrabi when it comes along. Haven't had cooking excitement in awhile and I like to see it back!
Cuppycakes for Tuesday
3/6/12: Yellow Cupcakes with Peanut Butter Frosting
Haven't shared much of my cooking with you all lately, but I'm still here! I've been cooking and baking almost every day each week and trying out some new recipes every now and then. Two of the "newbie" recipes I gave a go as of late were Yellow Cupcakes from Cook's Illustrated and Peanut Butter Frosting from the Bake-Off Flunkie blog. Boy, that sounds like a yummy duo, eh?
It may sound strange to some, but I like to bake a dessert and have that as the sole dish for evening supper every once in awhile. My family always has lunch as the main meal of the day, so we can get by with dessert-for-supper with no problem. So for yesterday's supper, I made these cupcakes on the spur of the moment. Yeah, I would have liked to plan supper in advance but the days got away from me!
Here's how they turned out yesterday:


Haven't shared much of my cooking with you all lately, but I'm still here! I've been cooking and baking almost every day each week and trying out some new recipes every now and then. Two of the "newbie" recipes I gave a go as of late were Yellow Cupcakes from Cook's Illustrated and Peanut Butter Frosting from the Bake-Off Flunkie blog. Boy, that sounds like a yummy duo, eh?
It may sound strange to some, but I like to bake a dessert and have that as the sole dish for evening supper every once in awhile. My family always has lunch as the main meal of the day, so we can get by with dessert-for-supper with no problem. So for yesterday's supper, I made these cupcakes on the spur of the moment. Yeah, I would have liked to plan supper in advance but the days got away from me!
Here's how they turned out yesterday:


For Christmas I received the Cook's Illustrated Cookbook (which I think weighs more than two bibles put together!), and this cupcake recipe is one of many I've tried so far from the book.
So what do I think of the "cake" part of this cupcake?
I don't know if I baked them for too long or what, but they were a bit dry. The batter was a thick one so it was difficult to evenly fill the cupcake liners, which led to some baking faster than others. So right now I am on the fence about them.
So what do I think of the frosting?
I wanted to have the family's opinion on this one because I wanted to give feedback to the recipe creator. Here's the feedback:
Papa: OK. Isn't a peanut butter fan.
Sibling 1: Very good.
Sibling 2: Very good.
Sibling 3: YUMMY!
Sibling 4: OK.
Me: Good, but a bit too sweet for me. Would add more butter.
All and all, it looks like it is a keeper, even though I may not be a huge fan. I'm a frosting fuss budget, especially as of late. I've been making more cooked frostings than buttercreams (like this one), and it is hard to go back.
Thanks, Tiffany, for sharing the recipe on your blog! Frostings are one of my favorite things to make so I'm glad to add another one to my file.
Thinking of Garlic
1/23/12: Chicago-Style Garlic and Butter Pizza
When it came time to figure out what to have for Monday lunch, garlic kept on coming to mind. Probably caused by the chicken vesuvio I have planned for later this week; that recipe sure has the garlic!
So, yes, garlic. The recipe that jumped out at me was for a Chicago-style pizza that has a garlicky pizza crust to boot. Annemarie gave me this recipe late in 2010 and I made it for the first time about a month ago. Not too sure where she found it, but it really is an extremely flavorful pizza crust and doesn't take that much work to put together. May have a lengthy preparation time like all yeast doughs, but that is fine with me during these long winter days.
So here is the recipe for those who want to try it out:
Directions:
1. In large bowl, dissolve yeast in 1/4 cup lukewarm water. Add 1/4 cup flour and the sugar, stir together. Cover with plastic wrap and let rise in a warm place for 20 minutes.
2. Stir the remaining 1 cup lukewarm water, 3 cups flour, cornmeal, and salt into the yeast mixture. Combine the butter and garlic; mix into the dough.
3. Turn out onto a lightly floured work surface and knead until soft and elastic, about 10 minutes. Lightly grease a large bowl, add the dough and turn to coat. Cover and let rise until doubled in size, about 1 hour.
4. Deflate dough then knead for 2-3 minutes. Grease a 13x9" baking dish and press in dough to cover bottom and 2 inches up the sides; let rise for 20 minutes. While waiting for dough to rise, preheat over to 400F.
5. Top pizza dough with your favorite toppings and bake for 30 minutes.


When it came time to figure out what to have for Monday lunch, garlic kept on coming to mind. Probably caused by the chicken vesuvio I have planned for later this week; that recipe sure has the garlic!
So, yes, garlic. The recipe that jumped out at me was for a Chicago-style pizza that has a garlicky pizza crust to boot. Annemarie gave me this recipe late in 2010 and I made it for the first time about a month ago. Not too sure where she found it, but it really is an extremely flavorful pizza crust and doesn't take that much work to put together. May have a lengthy preparation time like all yeast doughs, but that is fine with me during these long winter days.
So here is the recipe for those who want to try it out:
Chicago-Style Garlic and Butter Pizza Crust
Yield: One 13x9 pan
- 1 (2-1/4 tsp.) package active dry yeast
- 1-1/4 cups lukewarm water
- 3-1/4 cups flour, plus more for dusting (What I Did: I used 1/2 all-purpose and 1/2 bread flour)
- 1 tsp. sugar
- 1/2 cup cornmeal
- 1 tsp. salt
- 4 tbsp. butter, melted
- 1 garlic clove, ground to a paste (What I Did: I used 4 large cloves, minced them, and grounded them to a paste by sprinkling them with salt and smashing them against the cutting board with a chef's knife)
- pizza toppings, your choice (What I Did: My toppings were homemade pizza sauce--tomato sauce, dried basil, salt and pepper, sugar--mozzarella cheese, sliced bell peppers lightly sauteed, and pepperoni)
Directions:
1. In large bowl, dissolve yeast in 1/4 cup lukewarm water. Add 1/4 cup flour and the sugar, stir together. Cover with plastic wrap and let rise in a warm place for 20 minutes.
2. Stir the remaining 1 cup lukewarm water, 3 cups flour, cornmeal, and salt into the yeast mixture. Combine the butter and garlic; mix into the dough.
3. Turn out onto a lightly floured work surface and knead until soft and elastic, about 10 minutes. Lightly grease a large bowl, add the dough and turn to coat. Cover and let rise until doubled in size, about 1 hour.
4. Deflate dough then knead for 2-3 minutes. Grease a 13x9" baking dish and press in dough to cover bottom and 2 inches up the sides; let rise for 20 minutes. While waiting for dough to rise, preheat over to 400F.
5. Top pizza dough with your favorite toppings and bake for 30 minutes.


I am not only a sucker for garlic but for peppers as well. Can you tell? :)
Project Cookie for Christmas 2011
 |
| { source } |
So questions arose like "did we use shortening or butter?", "how long does this dough need to chill?", and "how many times the recipe did we use?"
To help ourselves when future cookie baking beckons, I am writing down here what we did this year with all the nitty-gritty details. Because all in all, I think each cookie turned out well and I would like to repeat our results.
1. Nestle Toll House Chocolate Chip Cookies
Recipe: used the recipe on the back of the morsel package
How Many Times the Recipe: used 1 recipe
Yield: made little less than one tin
Shortening or Butter: used room temp. butter
Was Dough Chilled: no
How Were Cookies Formed: dropped by spoonfuls
How They Turned Out: cookies were somewhat thin (1/2" thick) and were soft and chewy
Side Notes: none
2. Cherry Surprise Balls
Recipe: old family recipe -- blogged about it here
How Many Times the Recipe: 2-1/2 times
Yield: little less than one tin
Shortening or Butter: used room temp. Crisco butter flavored baking sticks
Was Dough Chilled: chilled in fridge for 1 hour
How Were Cookies Formed: formed into balls by hand after dough was chilled
How They Turned Out: came out perfectly round and with a shortbread-like texture. No flat bottom.
Side Notes: best indicator when these light cookies are done is when their bottoms turn golden brown. Cookies will remain soft until completely cooled. Did raise oven temp. to 350F.
3. Snowball Cookies
Recipe: old family recipe -- blogged about it here
How Many Times the Recipe: 1-1/2 times
Yield: little less than one tin
Shortening or butter: slightly soft butter
Was Dough Chilled: no
How Were Cookies Formed: formed into balls by hand; used flour to prevent stickage
How They Turned Out: turned out round and with a shortbread-like texture. No flat bottom.
Side Notes: cookies are done when edges are slightly brown. Kept dough in fridge when waiting for first batch.
4. Vanishing Oatmeal Raisin Cookies
Recipe: Quaker Oats recipe
How Many Times the Recipe: 1 recipe
Yield: one full tin
Shortening or butter: slightly soft butter
Was Dough Chilled: no
How Were Cookies Formed: dropped by spoonfuls.
How They Turned Out: cookies did not spread much, remained tall. Crispy exterior and chewy interior.
Side Notes:
5. White Chocolate Cherry Chunkies
Recipe: a Paula Deen recipe -- blogged about it here
How Many Times the Recipe: 1-1/2 times
Yield: little over one tin
Shortening or butter: room temp. butter
Was Dough Chilled: no
How Were Cookies Formed: used small ice cream scoop
How They Turned Out: cookies spread moderately. Turned out chewy and slightly crunchy.
Side Notes: used dried cherries instead of candied. Used 6 oz of dried for 1-1/2 times the recipe.
6. Peanut Butter Cookies
Recipe: from a cookbook of mine, A Year of Cookies by Lorraine Bodger
How Many Times the Recipe: 2 times
Yield: little over one tin
Shortening or butter: room temp. butter
Was Dough Chilled: no
How Were Cookies Formed: used small ice cream scoop and pressed down each cookie with a fork
How They Turned Out: cookies spread moderately. Turned out to be slightly crunchy.
Side Notes:
7. Drop Sugar Cookies
Recipe: created by Tiffany from the Bake-off Flunkie blog.
How Many Times the Recipe: 1-1/2 times
Yield: one full tin
Shortening or Butter: cold butter cut into small pieces
Was Dough Chilled: no, but dough was set aside at room temperature for 15 minutes before forming the cookies
How Were Cookies Formed: used small ice cream scoop
How They Turned Out: cookies spread moderately. Had a slight crisp exterior and a chewy interior.
Side Notes:
How to Make Chicken Vesuvio--Step by Step
This recipe has a lot of history and not only in the Italian culinary world, but in my family's as well. It has been a special meal choice for the folks here for decades! Our version includes multiple heads of garlic, lots of white wine, and a few secrets.
I've been cooking the family meals this past year and a couple weeks ago I attempted this dish for the first time. At the start, I didn't even have a vague idea on how to pull this thing together, so I spent my time bombarding my father with Vesuvio-ly questions, (which he took just fine. . . He likes to talk about food), all morning long. In the end it turned out to be very, very yummy!
The dumb thing I did, or should I say didn't do, was write down exactly what I did. I mean, here I was hunting down every possible nugget of information on this recipe and I didn't write down a thing. Yeah, stupid me. And I was feeling really stupid today when I wanted to give this Vesuvio a try again. Start from scratch once again!
Didn't remember much at the beginning but after talking about it with my father (again) it sort of came back to me. Anyhow, I managed to come close to what I did before and now I am writing it down here for reference. Not going to make the same mistake twice!
Ingredients:
Instructions:
1. Preheat oven to 400F. In two large casserole dishes or steamer trays, pour some vegetable oil to coat the bottoms. Add drumsticks to pans and season them with salt and pepper. Place pans in oven, uncovered. After 30 minutes turn oven temperature down to 375F.
2. In small saucepan, melt butter. Add oregano, garlic salt, and minced garlic to butter. Saute garlic on medium-high until fragrant: about 1 minute. Add 2 cups of wine to garlic mixture and bring to a boil. Once boil is reached, add bouillon cubes and stir until dissolved. Remove pan from heat.
3. Wash potatoes and slice them into halves or quarters, depending upon their size. The potato wedges in this dish is unusually large in size so keep them big!
4. Once chicken has been cooking for 1 hour it is time to add the potatoes. Nestle the wedges underneath the drumsticks to allow the potatoes to soak up the chicken juices. Next, pour the wine mixture over the chicken and potatoes, cover, and return pans to oven.
5. After 30 more minutes of cooking, stir the chicken and potatoes so that everything is immersed in the sauce. Add some water to bring sauce level half way up the pan contents.
6. Cook for another 20 minutes. Remove cover, raise oven to 400F and cook for another 10 minutes. The last 10 minutes at this high temperature helps with the browning of the meat and vegetables. And there you have it. . . Enjoy!
*roughly two drumsticks per person
**I used a type of white potato that has yellow skin. It is called Kennebec (which we grow at the farm), and it is a starchy potato that holds it shape well while still having a smooth, buttery texture.
1. Preheat oven to 400F. Add some vegetable oil to two large casserole dishes or steamer trays. Place chicken drumsticks in pans and season with salt and pepper. Place pans in oven, uncovered. After 30 minutes turn oven temperature down to 375F.


4. Wash potatoes and slice them into halves or quarters, depending upon their size. The potato wedges in this dish is unusually large in size so keep them big!


6. After 30 more minutes of cooking, stir the chicken and potatoes so that everything is immersed in the sauce. Add some water to bring sauce level half way up the pan contents.
7. Cook for another 20 minutes. Remove cover, raise oven to 400F and cook for another 10 minutes. The last 10 minutes at this high temperature helps with the browning of the meat and vegetables. And there you have it. . . Enjoy!


I've been cooking the family meals this past year and a couple weeks ago I attempted this dish for the first time. At the start, I didn't even have a vague idea on how to pull this thing together, so I spent my time bombarding my father with Vesuvio-ly questions, (which he took just fine. . . He likes to talk about food), all morning long. In the end it turned out to be very, very yummy!
The dumb thing I did, or should I say didn't do, was write down exactly what I did. I mean, here I was hunting down every possible nugget of information on this recipe and I didn't write down a thing. Yeah, stupid me. And I was feeling really stupid today when I wanted to give this Vesuvio a try again. Start from scratch once again!
Didn't remember much at the beginning but after talking about it with my father (again) it sort of came back to me. Anyhow, I managed to come close to what I did before and now I am writing it down here for reference. Not going to make the same mistake twice!
Chicken Vesuvio
Serves: 6-8*
Cooking time: 2 hours
Ingredients:
- 16 chicken drumsticks
- 20 medium to large red potatoes or Yukons**
- 6 tbsp. butter
- 1-1/2 tbsp. dried oregano
- 1 tbsp. garlic salt
- 20 cloves garlic, minced
- 2 cups white wine
- 2 chicken bouillon cubes
- Vegetable oil
- salt and pepper
Instructions:
1. Preheat oven to 400F. In two large casserole dishes or steamer trays, pour some vegetable oil to coat the bottoms. Add drumsticks to pans and season them with salt and pepper. Place pans in oven, uncovered. After 30 minutes turn oven temperature down to 375F.
2. In small saucepan, melt butter. Add oregano, garlic salt, and minced garlic to butter. Saute garlic on medium-high until fragrant: about 1 minute. Add 2 cups of wine to garlic mixture and bring to a boil. Once boil is reached, add bouillon cubes and stir until dissolved. Remove pan from heat.
3. Wash potatoes and slice them into halves or quarters, depending upon their size. The potato wedges in this dish is unusually large in size so keep them big!
4. Once chicken has been cooking for 1 hour it is time to add the potatoes. Nestle the wedges underneath the drumsticks to allow the potatoes to soak up the chicken juices. Next, pour the wine mixture over the chicken and potatoes, cover, and return pans to oven.
5. After 30 more minutes of cooking, stir the chicken and potatoes so that everything is immersed in the sauce. Add some water to bring sauce level half way up the pan contents.
6. Cook for another 20 minutes. Remove cover, raise oven to 400F and cook for another 10 minutes. The last 10 minutes at this high temperature helps with the browning of the meat and vegetables. And there you have it. . . Enjoy!
*roughly two drumsticks per person
**I used a type of white potato that has yellow skin. It is called Kennebec (which we grow at the farm), and it is a starchy potato that holds it shape well while still having a smooth, buttery texture.
How to Make Chicken Vesuvio Step by Step
(condensed written recipe is found above)
1. Preheat oven to 400F. Add some vegetable oil to two large casserole dishes or steamer trays. Place chicken drumsticks in pans and season with salt and pepper. Place pans in oven, uncovered. After 30 minutes turn oven temperature down to 375F.

2. Now to make the garlic wine sauce, which includes garlic salt, dried oregano, butter, white wine, minced garlic, and chicken bouillon cubes.


3. In small saucepan, melt butter. Add oregano, garlic salt, and minced garlic to butter. Saute garlic on medium-high until fragrant: about 1 minute. Add 2 cups of wine to garlic mixture and bring to a boil. Once boil is reached, add bouillon cubes and stir until dissolved. Remove pan from heat.


4. Wash potatoes and slice them into halves or quarters, depending upon their size. The potato wedges in this dish is unusually large in size so keep them big!


5. Once chicken has been cooking for 1 hour it is time to add the
potatoes. Nestle the wedges underneath the drumsticks to allow the
potatoes to soak up the chicken juices. Next, pour the wine mixture
over the chicken and potatoes, cover, and return pans to oven.


6. After 30 more minutes of cooking, stir the chicken and potatoes so that everything is immersed in the sauce. Add some water to bring sauce level half way up the pan contents.
7. Cook for another 20 minutes. Remove cover, raise oven to 400F and cook for another 10 minutes. The last 10 minutes at this high temperature helps with the browning of the meat and vegetables. And there you have it. . . Enjoy!


Subscribe to:
Posts (Atom)


