Strawberries and Cake for February


2/18/11: Sponge Cake Served with Strawberries
I was just going through my Sabbath Supper photos and saw a folder named "Sponge Cake and Strawberries." Oops! I forgot to post about this dessert I made all the way back in February. So without further ado, I bring you my account of sponge cake and strawberries that should have been made public a month ago. :)
The sponge cake recipe came from the good ol' Betty Crocker cook book of ours. I chose the recipe entitled: "Fluffy Sponge Cake" because it was calculated for a 13 x 9 pan and also because it uses all the egg yolks and whites. It is not always easy for me to use up the leftover yolks or whites quickly, so it is a good idea to have recipes like this one on hand. Find the recipe below.
The strawberries are actually our own which we froze with sugar last year. Learn how to freeze your own by reading this previous post.
Here is the recipe written out for you:
Fluffy Sponge Cake
Yield: One 13x9 pan
Ingredients:
6 egg yolks
1-1/2 cups granulated sugar
1-1/2 cups cake flour OR all-purpose flour
1 tsp. baking powder
1/2 tsp. salt
6 tbsp. cold water
1 tsp. grated lemon rind
1 tsp. lemon extract
6 egg whites
1/2 tsp. cream of tartar
Directions:
Grease your pan BUT ONLY THE BOTTOM.
Preheat your oven to 325 degrees F.
In a medium bowl, beat the egg yolks until thick (at least 5 minutes). Beat sugar in gradually. In a separate, smaller bowl, sift together flour, baking powder, and salt. Beat dry ingredients into egg yolk mixture alternately with water, lemon rind, and lemon extract.
In a large bowl, beat egg whites and cream of tartar until stiff. Gradually and gently cut and fold the egg yolk mixture into the beaten whites. Pour batter into pan and bake for 35 to 40 minutes. Serve with strawberries.


In Memory of the Pillsbury Dough Boy

I don't normally do this here at Sabbath Supper but I wanted to share with you a little snippet about the Pillsbury Dough Boy's Funeral. My younger sister just sent it to me today and it proved to be one of the most hilarious news articles to date! Enjoy! :)
"Dear friends, It is with the saddest heart that I pass on the following. Please join me in remembering a great icon. The Pillsbury Doughboy died yesterday of a yeast infection and complications from repeated pokes in the belly. He was 71.
Doughboy was buried in a lightly-greased coffin. Dozens of celebrities turned out to pay their respects, including Mrs. Butterworth, Hungry Jack, the California Raisins, Betty Crocker, the Hostess Twinkies, and Cap'n Crunch. The grave site was piled high with flours as long- time friend, Aunt Jemima, delivered the eulogy, describing Doughboy as a man who never knew how much he was kneaded. Doughboy rose quickly in show business, but his later life was filled with turnovers. He was not considered a very "smart" cookie, wasting much of his dough on half-baked schemes. Despite being a little flaky at times, he -- even still, as a crusty old man -- was considered a roll model for millions. Toward the end, it was thought he would rise again, but alas, he was no tart.
Doughboy is survived by his wife, Play Dough; two children, John Dough and Jane Dough; plus they had one in the oven. He is also survived by his elderly father, Pop Tart. The funeral was held at 3:50 for about twenty minutes."
Source found here.
Cooking Lesson -- How to Make Kolache Step by Step

Ah, Kolache! This delightful Czech pastry has a cream cheese or fruit filling and is one of the undisputed favorite desserts of my Papa. What better time to make this delicious favorite than Fat Tuesday? I was thinking about doing Paczki, a Polish pastry, but it requires deep frying and I didn't feel like tackling a pot of hot oil. It takes me awhile to build up enough confidence to take on such an ordeal!
So Kolache it was. And this time I am going to do something different. I am going to share with you a step-by-step cooking lesson on how to make cream cheese filled Kolache, from start to finish. I just recently bought a digital camera for myself so I wanted to give this a try!
Baking Bread for the First Time
2/11/11: Grandma's Oatmeal Bread
If my younger sister, Catherine, was asked, "What is your favorite food?" She would say, "BREAD!" She adores bread in every shape or form and loves recipes that include whole flours or oats. She made bread in the bread machine before but she has never done it from scratch, and that is what she set out to do earlier this month. And I came along for the ride.
She chose Grandma's Oatmeal Bread from the Holiday 2009 issue of The Baker's Sheet, a magazine that is published by King Arthur's Flour. I wish I could write out the recipe here but it is copyrighted. Best thing to do is buy the back issue here.
The recipe includes rolled oats and molasses which I think is a great combination. Catherine did very well with following the recipe, the only problem that arose was the slow rising. The kitchen was probably too cold that day! Anyway, here is Catherine's first ever bread from scratch:


Scrumptious!
So is Catherine willing to make bread from scratch again? She says: "I'll stick to the bread machine." At least she gave it a go! ;)
Sweet Victory
2/08/11: Dulce de Leche Bars
I'm not sure why, but I always find it easier to write about desserts. Maybe it is because I cannot write a post without a picture and dessert photography is a piece o' cake compared to main entree dishes! I should try to change this habit and make sure I take some snapshots of dishes outside the realm of sweet.
So earlier this month I was planning on making Smitten Kitchen's adaptation of Dulce de Leche Cheesecake Squares, but realized that we were out of graham crackers. Oh dear! And earlier that day I made some dulce de leche (sweet milk in Spanish), out of two cans of sweetened condensed milk. What will I do with it now?
A quick search on the internet brought me to Land O Lakes' website and their Dulce de Leche Bar recipe. Sounds good doesn't it? Knowing that we had all the ingredients, I whipped up a batch and then frowned over the leftover dulce de leche sitting in the double boiler. Leftovers. . .
Now what about frosting? Aha! Frosting! So after mixing together an 8 oz. package of cream cheese (for my family are lovers of cream cheese frosting), a few tablespoons of dulce de leche, and a tad bit of milk, I made my very own frosting for this cake. And the verdict? Sweet victory of course! The bars had a golden brown color and were tender, moist, and sweet; not cloyingly sweet, however. And the bars made a good contrast with the thin layer of frosting on top. Perfect match.


To dress the bars up a bit, I drizzled some dulce de leche over the top of the frosting.
Jam and Cake. . . Scrumptious!
2/4/11: Blackberry Jam Cake
Doesn't that recipe title sound so scrumptious? For me, putting together jam and cake (two of my favorite things), sounds like perfection. That title is actually what drew me to baking this cake last Friday. I found the recipe in the Nov/Dec 2010 issue of Cook's Country magazine that we subscribe to (check out what America's Test Kitchen changed with this cake, an Appalachian staple, here). I wish I could post the recipe here but copyright issues, ya know.
Anyhow, let me explain this cake to you a little bit. The actual cake is spiced with cinnamon, allspice, and cloves and it also has delicious blackberry jam added. The frosting that the magazine had teamed up with the cake was Caramel Miracle Frosting. And also chopped pecans were added to the side of the cake.
Let me tell you, I like frosting. And I like trying out new ones. So the Miracle Frosting was right up my alley! It is a cooked frosting that starts with a mixture of brown sugar, cornstarch, and flour. Then a load of butter is added and mixed until light & fluffy.
Did I make any modifications to the recipe? I didn't make a Caramel Miracle Frosting, I just made the 'original' version which has white sugar instead of brown. I also omitted the pecans and I used blackberry preserves instead of jam.
Both the cake and the frosting turned out very well and this cake is a great contender for birthdays! (I have two requests already!)
So are there any notes I should leave for myself? Yes.
1. There didn't seem to be enough frosting to cover the entire cake, probably should do 1 1/2 times the recipe next time.
2. I probably need to go a tad bit less on the amount of preserves used for the filling. It sort of leaked to the sides making it harder to frost.
So here it is. . .


Lemon Meringue Pie from Scratch
1/28/11: Lemon Meringue Pie


Last Friday my younger sister and I were trying to figure out a dessert to make for dinner. We chose a rather risky one: Lemon Meringue Pie. Because this pie is such a classic (it is right beside chocolate chip cookies, pound cake, and blueberry muffins in the realm of baking in my opinion), you would think that it is an easy recipe to execute. Not so. Especially for a person who has failed in the past with the meringue part!
We used Annemarie's Betty Crocker cookbook for the crust, the filling, as well as the meringue topping. The filling and meringue recipes worked out well, but we weren't happy at all with the crust recipe. There just wasn't enough dough to work with and we actually had to go back and make another batch. Next time I should use our traditional go-to recipe for a double pie crust and simply cut the recipe in half.
Now for the filling and meringue part:
Lemon Meringue Pie
Yield: Two 9" pies (my family likes their pie!)
Ingredients:
Two 9" pie shells that have been blind baked
3 cups sugar
2/3 cup cornstarch
3 cups hot water
6 egg yolks, slightly beaten
6 tbsp. butter
8 tbsp. lemon juice
3 tbsp. grated lemon rind
Meringue:
6 egg whites
1/2 tsp. cream of tartar
12 tbsp. sugar
1 tsp. flavoring (optional)
Directions:
In a saucepan, mix together the sugar, cornstarch, and hot water. Cook over moderate heat, stirring constantly, until mixture thickens and boils. Boil 1 minute. Beat a little of the hot mixture into the egg yolks to temper them. Then move warmed egg yolks to the cornstarch mixture. Boil 1 minute longer, stirring constantly. Remove from heat. Continue stirring until smooth. Blend in butter, lemon juice, and lemon peel.
Onto the meringue! In a large, clean bowl, beat white with cream of tartar until frothy. Gradually beat in sugar, a little at a time. Continue beating until stiff and glossy.
Now to assemble the pie. Pour filling into the pre-baked pie shells and smooth top. Spoon the meringue on top of filling in large dollops. Try to smooth out--while not disturbing the filling below--and make fun swirls or peaks with your spoon.
Move pies to a 400F preheated oven and bake for 8-10 minutes, or until meringue is golden brown.
---------------------------
So that's the recipe but I do want to write here some things I would change next time. First off, Papa and Annemarie said that they would like more meringue on top as well as a stronger lemon flavor. So for next time, I will maybe use 5 eggs per pie and add the extra yolks to the filling; Annemarie said that the extra yolks won't harm the recipe. All they will do is make the filling slightly thicker. She's made this pie before so she should know!
And I will add a couple more lemons to the mix to get a real pucker sensation!

You may notice here that this meringue is darker than what you are used to. That is way my family likes it even if it causes "weeping."


Ciabatta Bread Pizza
1/24/11: Ciabatta Bread Pizza


Meal details: Pizza with a Ciabatta bread crust, homemade pizza sauce, and a pepper, pepperoni, and cheese topping.
Defining moments: First time for us to try out Ciabatta bread, which, by the way, is an Italian bread that is usually used when making panini. The interior of the bread has very large holes so it a great candidate for soaking in flavors like olive oil.
Recipe sources: No recipe was needed for this pizza. Annemarie came up with the concept last Fall and we've been waiting to try it out since. We actually prepared our bell peppers for the freezer in a special way (cut them into ring shapes), just for this pizza.
The pizza sauce was concocted by me, so read on to find it!
What I learned: I created a very tasty recipe for the pizza sauce. I made Sloppy Joe's the Saturday before (I used this recipe here), and I kept a pint of our tomato puree and about a cup of canned tomato paste. On the day of this pizza's creation, I combined these two ingredients with some spices, sugar, and apple cider vinegar. I'll write it out here:
Homemade Pizza Sauce
Yield: Makes about 3 cups
Ingredients:
- 2 cups (16 oz) tomato sauce
- 1 cup (8 oz) tomato paste
- 2 tbsp. apple cider vinegar
- 1 tbsp. Worcestershire sauce
- 2 tbsp. white sugar
- 2 tsp. salt
- 1 tsp. pepper
- 1 tbsp. dried basil
- 1 tbsp. garlic salt
Instructions: Combine all ingredients in a medium sauce pan and cook over moderate heat. Reduce until consistency resembles apple sauce. I recommend tasting at this stage and adjust seasoning if necessary. When it comes to a tomato-based recipe, you usually need to change something in your ingredient lineup.
Now how exactly did I put this pizza together?
I cut the ciabatta bread loaves in half lengthwise and brushed them with a 1/4 cup of olive oil. I then placed them in the oven for about five minutes at 425F; just to crisp up the cut side. I then smeared my pizza sauce over the entire surface of the bread and followed it with lots of shredded mozzarella and monterey jack cheese. On top of the cheese, I fanned out some pepperoni and bell pepper rings evenly. I moved both pizzas to the oven preheated at 425F and I baked them for about 20 minutes, or until the cheese was golden brown and the peppers were sizzling.
Any modifications? Created this recipe.
How it tasted? Very, very, very, very, GOOD! The ciabatta bread made a terrific, crunchy crust and the sauce was zingy and had distinctive tomato flavor.
How about a 2nd time? Oh yes, definitely. And maybe next time I will use homemade ciabatta bread--sounds interesting, huh?


My Old Kentucky Pie
1/07/11: Kentucky Pie
This recipe came from the Holiday Baking 2009 Issue of Cooking with Paula Deen. I, by no means, had the intention of baking this pie when I was browsing the magazine. I was much more interested in the buttermilk pie that was featured on the same page. But it so happened that a) I wanted to bake a pie that day, b) I wanted something chocolate-ly, and c), I wanted something with nuts. So that is how I gravitated towards this pie recipe, which I never heard of before.
Kentucky Pie has a truck load of nuts and chocolate--and then some. I should know about the nuts because me and my sister had to crack all of them by hand. What a job! Pecans are not that easy to crack, there is a required skill for sure. The best way to crack them we found was to crack both the top and the bottom off first, then crack the nut lengthwise. But you need to make sure you crack it BETWEEN the two inner pecan halves. Otherwise, you break the halves into a million and one pieces. :)
As you can see, this pie is not for the faint of heart:

Get a load of all that chocolate! I think I've died and gone to heaven. Here is some more cocoa goodness coming your way:


Did I Forget Something?
12/25/10: Christmas Cake


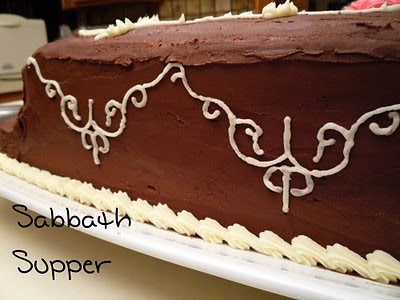


In answer to my post's title: Yes. I completely forgot to post about the cake I baked and decorated for Christmas! How on earth did that happen? Anyhoo, here it is now:


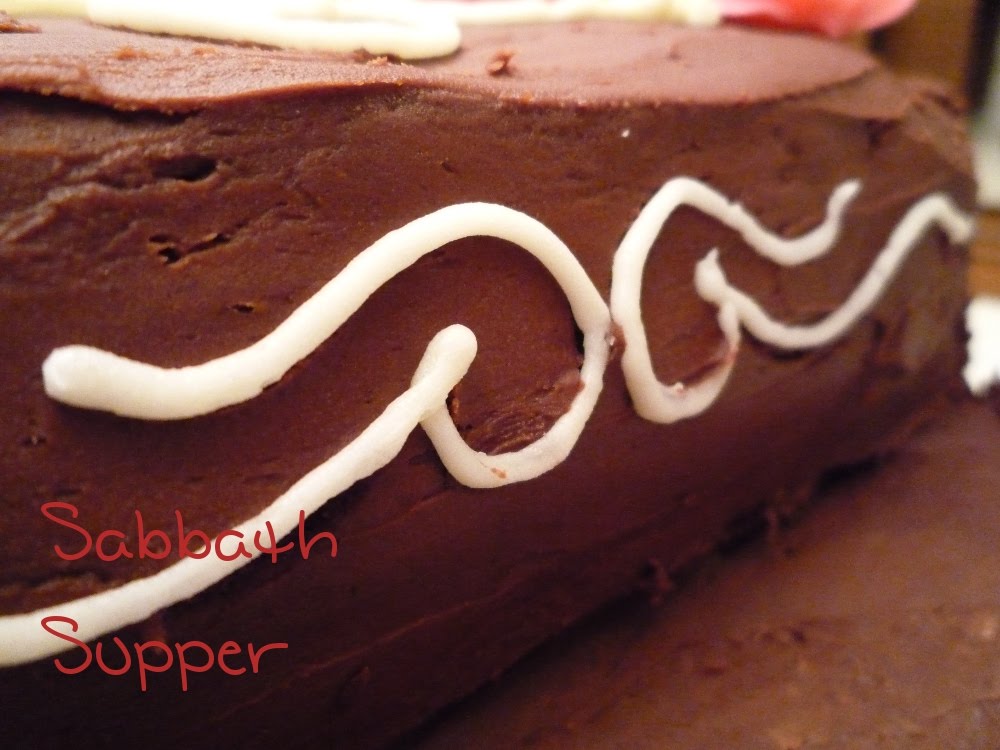
So what recipe(s) did I use?
I used the New Fudge Cake recipe from Annemarie's Betty Crocker cookbook. Here is a scan of the page:

For the cake's filling I used Swiss Meringue Buttercream from this source. The chocolate frosting came from the Sour Cream Cake I did before. And finally, the white frosting I used for piping (as well as the roses) is from here. Whew! Lots of different recipes this time!
What decorating techniques did I use?
I used two 13 x 9 cakes, stacked them on top of each other, and cut the top layer to make it resemble a tiered cake. After the carving, I piped a shell border at the base of the cake, piped roses using a specific rose tip, and made decorative "facades" around the sides of the cake using a template that I received for my birthday last year. For Christmas I received some liquid dyes (Wilton brand) that can be mixed with frosting, and that is what I used for the colored roses.
How did it taste?
This might actually be my favorite cake as of yet. The actual cake was very moist, chocolate-ly and held up well to being stacked. And the chocolate frosting was just as good as I remembered. But the real attribute of this cake was the Swiss Meringue Buttercream that I used for the filling. Papa said that it reminded him of an expensive torte he had long ago. It was so delicious!
Homemade Hot Dog Buns
12/29/10: Hot Dog Buns Straight from Our Kitchen


My family likes to include hot dogs in our weekly meal schedule because of two reasons: they are inexpensive and they only take a half an hour to cook. I like hot dogs a lot (especially Chicago-style!), so I don't mind this tradition whatsoever!
There is one thing, though, when it comes to this meal choice: the buns. If you don't buy them on sale, they cost way more than the hot dogs themselves. Is there any way to make them here at home?
Annemarie and I've tried making hamburger buns before (see my attempts here and here), but never gave the hot dog bun a try. So I searched the internet looking for some recipes, photos, videos, and inspiration and didn't really find a recipe for a soft bun. I really wanted to find a bun that would remind you of Wonder Bread or something in that field of bread texture.
My sister is the one that found the right site. J. Timothy King's blog to be exact. His post on making hot dog buns with the bread machine sparked my interest and I literally went straight to the kitchen after learning about it!
So I took out my bread machine's recipe book, found the recipe for White Bread, followed the directions for a one pound loaf, and selected "Dough" (#6). I used the dough cycle before when I made cinnamon rolls, read about it here. Find the White Bread recipe I used at the bottom of this post.
I removed the dough from the pan and divided it into six equal portions using my dough cutter. I formed each piece into a ball then rolled it into a log that was 6" in length. I placed the formed buns on a cookie sheet lined with non-stick foil and spaced them 1/2" to 1" apart. I covered them loosely with plastic wrap and placed them in a warm area (on top of a warm oven in my case), to rest for 45 minutes. After they rose I moved them to a 375F preheated oven and baked them for 10 minutes, or until they were lightly golden on top.
This is how they turned out:


I was very impressed when they came out of the oven! And they were perfect with the hot dogs. They were soft but they weren't like the Wonder Bread buns, I think they were better. :) As you can see, I made sure the buns were close to each other when baking. I thought it would result in softer buns if done this way. After examining the buns that were on the end of the lineup (the buns that would have more contact with the oven's radiating heat), I don't think it is necessary.
Buns without a bread machine? On 4-23-11 I tried making these buns without the use of the bread machine. They raised perfectly fine and I couldn't detect any difference in bun size or texture. The real key to doing any dough outside the machine is to find a warm spot in the kitchen. If it is warm and there are no drafts, you're all set.
Now for the White Bread recipe that I used to make these:
Simple and Easy Homemade Hot Dog Buns
Yield: 6 buns
Ingredients:
3/4 cup + 1 tbsp. warm water (about 110F)
1-1/2 tbsp. granulated sugar
1 tbsp. vegetable oil
1 tsp. salt
1 tbsp. dry milk
2-1/4 cups bread flour
1-1/4 tsp. active dry yeast
Directions:
When using a bread machine. . . Add all the ingredients to your bread pan in order they are written. Select Dough Cycle. Once cycle is done, follow instructions for "Forming Buns."
Without bread machine. . . In measuring cup, combine water, sugar, and yeast. Wait until yeast begins to foam; about 5 minutes. In medium mixing bowl, add oil, salt, dry milk, and flour; stir to combine. Make a well in the middle of the flour mixture and pour in yeast mixture. Stir with a wooden spoon until fully incorporated. Turn out onto dusted surface and knead for five minutes; dough should be smooth. Oil a large bowl with non-stick spray. Form dough into a ball and place in oiled bowl. Invert dough so oil is on top. Cover bowl with plastic wrap and place in a warm spot in kitchen that is free of drafts.
Allow dough to rise for 40 minutes. Deflate dough and let it rise for additional 20 minutes. Once dough is finished rising, follow instructions for "Forming Buns."
Forming Buns:
Deflate dough and separate dough into six equal pieces. (I do this by cutting the dough in half and then the halves into thirds.) Take a piece of dough and form it into a log that is about 6" to 8" in length. Lay the logs on a cookie sheet lined with parchment and cover them with plastic wrap that has been sprayed with non-stick spray.
Allow the buns to rise for 45 minutes. Remove plastic wrap and place cookie sheets in a 325F preheated oven and bake for 15 to 20 minutes or until buns are light brown on top.
Tips for you:
- Want buns with more chewiness? Add 1 tablespoon potato flour to each cup of flour for the recipe. It really makes a huge difference!
- Bread flour is not always inexpensive compared to all-purpose. Try using half bread flour and half all-purpose when you are making the dough. I've done this numerous times and haven't seen a real difference in flavor or texture. What I have noticed, however, is that they're easier to form; probably due to less gluten.
We Call it "Spaghetti Bread"
12-17-10: Spaghetti Bread


If anyone was to ask me, "What is comfort food for you?" the first dish that comes to mind is our homemade spaghetti sauce. Our spaghetti sauce, in all its goodness, consists of our tomato puree combined with our farm grown peppers, onions, and garlic as well as spices such as basil, marjoram, oregano, etc.
My family has been having our own spaghetti sauce almost every single week of the year for as long as I can remember. Every time I think of this meal I think of two things: my Papa (who pulls all the listed ingredients together and makes the masterpiece), and our farm's bounty. Two very comforting things for me! Now, I could give you the recipe for this sauce, but there really isn't one (it seems to be evolving every single time it's made), and even if I do concoct a written recipe, it wouldn't be like ours. I would need to send you our puree and veggies to make it legitimate!
Now, there is something else that is as old as our spaghetti tradition, but it hasn't had a very good reputation. It is called Spaghetti Bread. Spaghetti bread is a yeast bread done in the bread machine that has dried herbs and grated cheese added. If done right, it is absolutely perfection with a spaghetti dinner. But perfection has been reached few times with this bread. Almost every time we attempted to wrestle this recipe, we would find a deflated loaf at the bottom of our bread machine. Let me tell you, it is enough to bring tears to your eyes.
We came up with a lot of theories on the cause of these mishaps: too much water, too little, acid in the spices, too much salt, etc. etc. etc. So we kept on trying new versions of the recipe, taking out some of this, adding some of that. . . But nothing worked until a couple Fridays ago.
My Papa thought, "Why not use the wheat setting on the bread machine and add the garlic, cheese, and spices at the time the machine alerts you to add addition flavorings, such as raisins and cinnamon?"
Sounded good to me! I gave it a go, following his specific instructions, and it turned out perfectly. It was one of the tallest Spaghetti Breads we ever saw.


See what I mean?
This is what I did from start to finish:
Spaghetti Bread
Yield: 1 pound loaf
Ingredients:
- 9 oz. warm water (about 115 degrees F)
- 4 1/2 tsp. active dry yeast
- 2 1/2 tbsp. sugar
- 3 cups bread flour
- 1/4 cup olive oil
- 1 1/2 tsp. salt
Dough Flavoring Ingredients:
- 1 head garlic
- 1/2 cup grated parmesan cheese
- 1 tsp. basil
- 2 tsp. Italian seasoning
Directions:
To bread pan, add water, yeast, and sugar. Stir and proof for 10-15 minutes. Next add bread flour, oil, and salt. Set machine to "Whole Wheat" setting (#3) and "Medium" (A).
Now to make some garlic puree. (I learned about this technique from The Healthy Bread in Five Minutes a Day cookbook.) Take garlic, with the skin and stem still on, and wrap it in one layer of aluminum foil. Place garlic foil packet into 375 F oven and bake for 45 minutes. Remove from oven, open packet, and allow garlic head to cool. Once cool, cut off the stem and squeeze garlic from skins. The garlic now resembles a paste and can easily be incorporated into the bread dough.
Combine cheese, spices, and garlic in a small bowl.
Machine will beep 1 hr 26 min after you press the START button on the machine, (or when bread time display reads 2:34), that is when you should add the garlic, cheese, and spice mixture to the bread pan.
All in all, it takes 4 hours for the machine to make the bread.
Garlic Puree Technique--Up Close. . .


Bread Machine Setting--Up Close. . .

Now, I suppose you can easily do this without the help of a bread machine, but I haven't given it a try yet. If I ever do I'll come back to this post and document it.
And here is one final glimpse of perfection. . .

;)
Subscribe to:
Posts (Atom)


